Saturday, August 31, 2013

Retro Yo-Yo Quilts

Here's what you can do with all those little bitty pieces of fabric you have left over from sewing projects.  It's a yo-yo quilt!  Yo-yo quilts became popular during the Great Depression, and I fell in love with them from the first time I saw a yo-yo quilt.  Making yo-yos are great because you can take the materials in a little baggy in your purse and sew no matter where you are--even in church (yes, it's true)!  You can make pillow covers, table runners, coasters, decoration for a guest towel...the possibilities are endless!


Quilts Can Represent a Lifetime

My throw may not look like much but it means a lot to me because each yo-yo represents an outfit or project I sewed for my family over the last twenty-five years.  My original inspiration came from a photo in Better Homes and Gardens (I think?).  This clipping is beat up cause it was kept in my idea notebook and referred to often.

Probably published in Better Homes and Gardens many moons ago.

Yo-yos Are Easy to Make

I just kept the quilt in a storage box and added onto it as I had more yo-yos and yo-yo squares completed.  I found the instructions for yo-yo quilting in an old craft book from the library, and I'm sorry to say I didn't keep the source info. on the book :(  I just made myself plenty of circle patterns out of old manila folders I planned on throwing out.  Then I would pin my pattern to leftover scraps of fabric and cut the material out.  This can be done assembly style (all the pinning and cutting done at once) so that the yo-yos are ready to be sewn.  Make them whatever size you want.  Put two yo-yos right sides together and sew a few stitches (whip stitch is fine) to attach them.  Use a thread that will not be too obvious.  I prefer quilting thread for this project because it is a lot stronger than regular thread.

source unknown

Resurgence in Yo-yo Crafts

Yo-yo quilting has become popular again and Hobby Lobby keeps instructions and durable circle patterns in the hand-sewing isle.  Instructions and ideas can be downloaded from their website as well.  This is a great beginning sewing activity for youngsters and my children have really enjoyed having something useful to do while watching television or waiting in the doctor's office.  

I hope you will try yo-yo quilting too.  I invite you to share ways you have used yo-yos in your crafting :)

Monday, July 15, 2013

Quick Mix Sausage Balls

These sausage balls are so easy to make and because you can freeze them, you always have something delicious for last-minute company to chow down on or to take to any gathering.  The sausage balls shown is a before-shot.  

I like to use parchment which I use several times before throwing away (this recipe makes a lot).  I actually find that these sausage balls bake up even better after they have been frozen, if that makes any sense.  I do not know if it is because the mixture and flavors have had time to meld.  I now prefer to have sausage balls with any type of breakfast menu rather than sausage by itself.  It really makes the sausage go a long way.  I promise to remember to eventually have an after photo (I keep forgetting)!


My sausage balls are made with a homemade baking mix I like to call Quick Mix.  My Quick Mix recipe uses wheat flour so it is a little bit healthier! (Find homemade Quick Mix and other recipes found on My Quick Mix post).

Quick Mix Sausage Balls
3 cups baking mix
1 lb. hot ground pork sausage
10-oz. pkg. sharp cheddar cheese, shredded

Combine mix, sausage and shredded cheddar in a large bowl, pressing mixture together with hands.  Shape into 3/4 inch balls and place on lightly greased baking sheets (or use parchment).  Bake at 400 degrees F. for 15 to 18 minutes or until lightly browned.  Yield: about 8 dozen.  Sausage balls may be frozen uncooked.  Bake frozen balls at 400 degrees F. for 18 to 20 minutes or until lightly browned.

I collect "Quick Mix" recipes, or it's sometimes just called baking mix.  I have even heard it called Missouri Mix--it has many different names.  My original recipe comes from an old Southern Living Magazine.  But it is my goal to find as many different, useful, and delicious recipes to use with my Quick Mix as possible and would love to hear of any others out there, so please let me know!


Friday, June 14, 2013

Perfect, Easy Biscuits

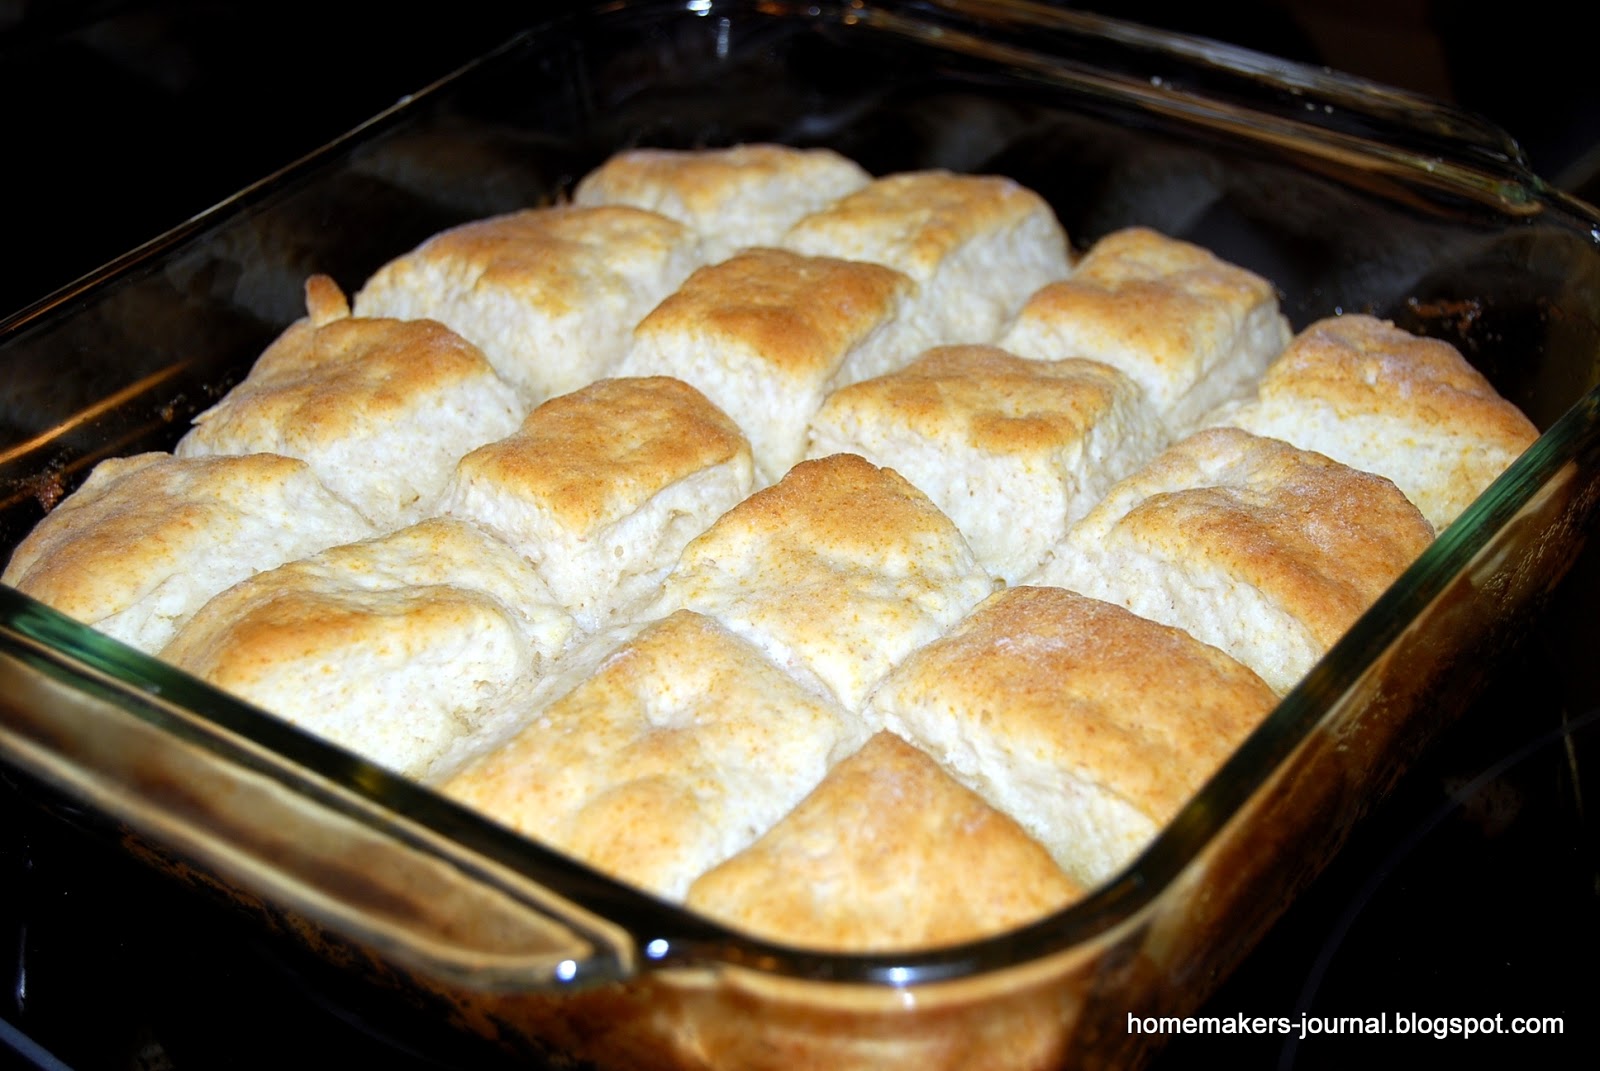
There are a few things that I think every homemaker should be able to do well, and one of those is make perfect biscuits.  I found a fabulous recipe for 7up Biscuits using Bisquick from www.plainchicken.com.  I was so excited to find this different and easy recipe using Bisquick since I make my own homemade version of a quick mix which uses wheat.


The recipe can be found and printed out at www.plainchicken.com.  I will describe the process adding some helpful hints for those who may be biscuit-making novices.

Step-by-Step Procedure

Heat the oven to 450 degrees F.

I go ahead and melt one-fourth cup of butter in my 9 x 9 inch pan in the oven.  Be sure to take the pan out when butter has melted so it won't brown.

Place two cups of Bisquick, or your own quick mix, into a large mixing bowl.  You can make a well in the center if you like and place a half-cup of sour cream (I like Daisy).

I actually work the sour cream gently into the Bisquick with my fingers until the sour cream has wetted most of the flour mixture thoroughly.

Then I pour 7 Up into a half measuring cup but more-than-likely, I will not use the entire half-cup.

Just sprinkle the 7 Up by Tablespoon over the top of the sour cream and Bisquick mixture.  Use a fork to fluff the 7 Up throughout the mix.

When most of the Bisquick has formed a ball in the center with just a little bit still hanging to the sides of the bowl, the dough is probably ready to gently knead together on a lightly floured counter.  The key is to use as little flour when kneading and only knead enough to be able to pat dough into a square.

Since I don't want to overwork my dough, I don't bother with the biscuit cutter.  I just pat the dough into a square slightly smaller than the measurements of my 9 x 9 inch pan (or 8 x 8), rather than use a rolling pin.

Use a sharp knife to cut into squares.  Then I place each square right onto the butter in the pan basically in the same exact way that I patted and cut it out on the counter.

Bake for 12-15 minutes, or until golden on top.  Cool in pan on a cooling rack (if they last that long!)  They are best served hot from the oven.

Baking Mix Recipes to Try

I like having the biscuits slightly connected so they are flaky and  moist.  This recipe is so good, the texture is almost like making yeast rolls.  This would be a great recipe for camp and cooked in a box oven!  My box oven instructions can be found at Homemaker's Journal, Easy Outdoor Cooking Recipes post.

For more delicious Quick Mix recipes see Homemaker's Journals beautiful and delicious Christmas Coffee Cake post and scrumptious Quick Mix Pancakes found at Some Favorite Campy Things, part 2.

I hope you enjoy this recipe as much as our family has.  I like to experiment with recipes using soda pop as an ingredient.  How do you use soda in your favorite recipes?

Monday, May 20, 2013

Nesting... Book Review: Wabi Sabi Style

Book Review, part 2:  Nesting, It’s A Chick Thing, by Ame Mahler Beanland and Emily Miles Terry.

“It’s All Good” describes the wabi sabi style in a nut shell.  Wabi Sabi, is kind of like Feng Shui, only different.  It is an Eastern design principle developed by Zen monks and is centuries old.  It is based on a tea practice and embraces the beauty of imperfection and irregularity.  

I bought this book!
If you love and value old things that have stood the test of time and like to use these in decorating the home, your style could be wabi sabi.  “The real power of wabi sabi is tapped when you extend its forgiving concepts to your life, your relationships and your self,” (Feathering Your Nest pp. 60-61). 

Wabi Sabi reminds me of shabby chic because it is important to avoid clutter and to take care of imperfect things, such as cleaning and oiling old wood floors rather than refinishing them to perfection.  There is nothing more beautiful than preserving the patina of aged wood.  Nesting... suggests decorating with multifunctional and/or meaningful, attractive items.  They can be interesting artistically, like unusual lamps or frames.  Collections of family photos and heirlooms can lend a spiritual feel to a room.  And of course with all Eastern principles, bringing nature inside is characteristic of wabi sabi.  Nesting... provides other sources about wabi sabi design.  If you are like me, the simple aspects of this style of decorating are very attractive and it is nice to know that for once I am fashionable!

What do you think?  Is Wabi Sabi style the new Feng Shui?  Let me know!

Wednesday, May 1, 2013

Nesting, It's A Chick Thing Book Review

Book Review, part 1:  Nesting, It’s A Chick Thing, by Ame Mahler Beanland and Emily Miles Terry.


Make it Your Beside Table Book

This book was a lot of fun to read.  I could see it being a great nightstand book in a guest room or displayed on the coffee table because you can pick it up any time and begin reading anywhere in the book.  It is kind of like a printed blog of posts, many of which are written by famous guest writers.  The book includes great quotes and recipes, interesting facts and background information, and whimsical vintage photos—all having to do with us “chicks.” 

Primping--it's A Girl Thing!

I plan on making time to try all the fun ideas on p. 223 “Preparty Primping.”  One idea was to try out several hand preparations, ending with 2 base coats on the nails, a pretty pink coat of nail polish, then use a toothpick and yellow and white nail polish to create daisies.  End with a top coat to protect the masterpiece!  Nails any garden aficionado would be proud of!

Gardening

Speaking of gardeners, a good handsoak after working in the garden consists of adding two drops of each to warm water:  chamomile, lavender and geranium essential oils.  After soaking your hands for 10 minutes, use a nail brush to remove any dirt that’s left under the nails.  Rinse thoroughly and pat dry with a soft, fluffy towel to seal in moisture.

The book recommends making a hand scrub to keep in a jar by the kitchen sink.  The scrub can be used to slough off the rough skin and stains from working in the garden.  As before, rinse with warm water and pat dry.  Combine 1 c. coarse salt, 2 drops peppermint essential oil, 3 drops lavender essential oil, ½ ounce sweet almond oil.

Soft-as-Daisy Hands

For soft-as-a-daisy hands, combine one tablespoon sweet almond oil and one-half teaspoon castor oil and add 2 drops of geranium and rosemary essential oils as well as 4 drops clary sage and lavender essential oils .  Massage hands with the oil using a soft towel to push back the cuticles carefully.  They recommend using cotton gloves (or white cotton tube socks), to keep hands covered overnight.  Be sure to rinse thoroughly with warm water—taking care to scrub the nails gently with soap to remove the oil—and pat dry.  

All of these ideas are a great way to have hands manicure-ready after a hard week of gardening!  However, the book was about a lot more than manicures.  This was what I was most interested in.  My next post is about Nesting, It's a Chick Thing, only I focus on a decorating trend I am really interested in.

I like the idea of leaving something fun to read for a guest in my home.  How do you fix up the guest room when you have a visitor?

Monday, April 15, 2013

Small Home Decorating Tips

Here are a few tips I have gleaned while trying to scale down to a small home (1400 sq. ft.).

Furniture

The more floor seen—the larger the room will feel—so have furniture that shows the floor.  Incorporate narrower furniture.  It can be a long couch (10 feet!), but if it’s narrow, it will take less space.  Flat screen TV’s have made all the difference in our home!  It’s the same principle.  Choose less bulky furnitshings.


Clean and Uncluttered

Show as much window as possible and clean them regularly.  Hang drapes higher and the room will seem taller.  Every time you bring new stuff home whether it’s books, collectibles or any kind of decorations—take something out of the home.  Cluttering the house, coffee table and shelves with stuff can make a home feel smaller. 

Style

I lean towards vintage furniture especially from the forties and fifties that was designed for smaller homes.  When refurbishing, I prefer slipcovers or reupholstering that will show the legs which are often interesting anyways (and shows more of the floor). 


Purge


Finally, don't be afraid to consign or donate extra stuff that just doesn't fit.  After going through this a few times, I'm less likely to make purchases without fully considering their impact on my space.

Do you think more people are scaling down to smaller spaces to live in lately?  This seems to be a new trend these days.  What do you think?

Monday, April 1, 2013

Laundry Rules!

I have a family of five:  a husband, a junior boy in high school, a sophomore girl in college, and a senior girl in college.  The two college students have had to come home and finish up at local colleges because our family’s single income has continuously gone down since Obama was elected (both times).  I’m back in school recertifying to hopefully attain that non-existent teaching position.  Therefore, it has been my mission to not waste a dime if I can help it. 

Photo from Homemaking for Teen-agers, Book 2, McDermott and Nicholas, 1958, p. 190


Where is Income Being Wasted?

Some major household expenses are utilities, food, and clothing.  These are things everyone basically wastes money on even though we generally have nothing to show for it when all is said and done.  Once we eat food, it’s gone (only the memory of a tasty meal and maybe an extra pound or two remain).  And when we take that extra-long shower (more than 10 minutes), or leave all the lights on and run the TV no one is watching, etc. nothing remains of this expense as well.  Some of us are very good at purchasing and caring for “classic” pieces and shoes that are well worth the initial expense.  However, more than likely, we buy clothes that will be outdated and worn out from misuse well before the expense has been worth it. 

Another Dave Ramsey Reference

I recently heard Dave Ramsey tell a man with a single income of $140,000 (I wish) that if his wife would invest $600 a month on a mutual fund for the next thirty years (she was forty), by the time she was seventy the mutual fund would be worth OVER TWO MILLION dollars!  Her issue was having the latest fancy car, but how much do we spend on clothes each month?  How much does that accumulate each year?  How much would we have if we were more careful with our expenditures and invested the money saved on electricity, food and clothes into a kick-!#* mutual fund.  I would like to be a millionaire if I’m lucky enough to reach seventy!  (P.S.—Dave didn’t mind if she had a fancy new car—just pay cash for it!  And with their income, and only buying a new car every three or four years, why would you not be able to do that?)

Take Care of Investments

Any-hoo, the point of this post is that I find myself at this late date, having to teach The Fam how to wash clothes so they don’t ruin my irreplaceable Whirpool Duet washer and dryer purchased in much happier financial times.  Since I hope to find regular work soon and cannot be on top of the clothes-washing situation, I have to protect our investments of appliances, clothing and utilities.  Plus, it would be nice if everyone knew how to wash clothes properly.  Hence—The Rules. 


The Rules

Believe me, there’s a story behind each rule.  Hopefully these rules posted above the washer and dryer will promote appreciation for how much things cost because “the buck stops here.”  No more Mom buying fancy detergents, clothing for school or gifts, or water and electricity to re-wash forgotten clothes that have mildewed in the washer overnight.  I encourage folks to start their own rules earlier than I did—kids (and husbands) can learn to wash clothes as soon as they have enough to make three loads of just their clothes!  Does this mean they will do it right when they leave home?  Apparently not.  But it won’t be because we didn’t try!  These are the rules for our home:

If you have a problem with these rules, the machine owner (Mom) will be glad for you to take your laundry elsewhere:

1.   Do not start laundry after 9pm.  Fold and put away each load immediately!!!
2.   Never use the Heavy Duty or Whites Cycle without the owner’s permission.  If the clothes are extra dirty or the load a little larger, press the button for more or less soil.  There is even a soak function if the clothes need to soak a while.  Whites and Heavy Duty take much more electricity and most of the time the normal cycle will suffice.
3.   ________ can wash her clothes with Mom’s since she has "so few clothes" because you can never wash all your clothes in one load—that will cost money in the long run due to clothes deteriorating quickly with such abuse.
4.   Everyone has a clothes basket assigned to them.  Only two people—________ and ________—may keep their clothes baskets in the hall bathroom.  DO NOT put your clothes in those baskets unless they are yours!!!!
5.   Everyone should do at least 3 loads of clothes each time they do their wash—DARKS, WHITES, and COLORS.  You can put it on a smaller cycle or get with someone else to make a larger load.
6.   Only ________ washes his clothes with the hypoallergenic detergent.  ________ has bought Gain, and Mom buys Wisk or New Era (red bottles) and Cling Free softeners.  There will always be a $1 detergent and softener available to those too cheap to buy their own.  Most of the time you fill the dispenser only 1/2-full of detergent.
7.   Only wash clothes if you will be available to take them out immediately and start the next load immediately.  With everyone doing their own wash, it will take forever if some refuse to stay on top of their laundry cycles.

Laundry Rules! Printable

In this economy, Dave Ramsey is a hot commodity.  Do you agree that you should "live like no one else so that someday you can live like no one else?"

Monday, March 18, 2013

Curing Scalp Acne

This might be kinda weird to write about, but maybe some people can relate.  It’s those itchy pimples on your scalp that ooze an oily substance when they pop.  Yeah gross!  Having them once-in-a-while is not really a problem.  It’s common around a menstrual cycle.  But some have a much bigger all-the-time problem, (and if you are unlucky to share a brush with them on a regular basis, you might get the problem too)!  

Circa 1970's The Last Time I Had Perfectly Healthy Hair!
I researched scalp acne and was able to eliminate it completely!  I’m not kidding.  I’m not really prone to this but as I said, sharing a brush or using the wrong shampoo or too many products on your hair could cause a horrible, itchy breakout!  If you have processed hair, or my suggestions aren’t working, consult a professional hair care consultant or even your doctor.

Some Possible Causes

Using too much of an oil-based shampoo or other hair-care products can also contribute to acne breakouts on the scalp.  I was using products to help with frizzy hair and I had to get rid of them.  I learned to read labels and avoid products such as shampoo, conditioner or gel that contain irritating substances like propylene glycol, sodium lauryl sulphate, parabens, alcohol, lanolin or mineral oil.  After spending a really long time in the pharmacy hair care isle, I was amazed how many brands have these ingredients—even the ones that are supposed to help with scalp problems.

Take Preventive Measures

To prevent scalp acne maintain good scalp hygiene.  Keep the scalp and hair free from dirt and grease by washing the scalp regularly with a mild shampoo and luke-warm water.  Keep anything like a hat or whatever you put on your head clean.  Clean hair brushes and combs and don’t share these with anyone.  Change pillowcases often.

Try This Cure

To cure scalp acne, I washed my hair with Johnson and Johnson Baby Shampoo.  Then I put a cup of vinegar in a condiment bottle (Walmart sells them in the plastics isle—it’s what you can put ketchup and mustard in).  I rinsed my hair with vinegar by squeezing the condiment bottle along my scalp until I felt every bit of scalp had been hit with the vinegar.  Then I rinsed very well with luke-warm water.  The colder the water, the better hair care products will rinse out.  That’s really important for eliminating scalp acne.  I recommend doing this cleansing process every so often to strip the build up in the hair.  I also avoided scratching my scalp and if I accidentally did, I would clean the pimple with hydrogen peroxide on a Q-tip.  

I also bought a brand new hair brush that prevents static cling (which was one reason I used products on my long hair).  And I hide this hairbrush and don’t let anyone else use it.  I keep other hair brushes around as decoys ;o)

Remember when the isle with shampoo contained a lot of other things besides just shampoo?  Have you checked out the local Walmart shampoo isle?  It is shelves and shelves on both sides of the isle, from top to bottom, filled with hair-care products.  Do you think hair-care products are being over-used?  Could this actually be harming our scalp and hair?  What do you say?

Monday, March 4, 2013

How to Teach Children Responsible Behavior

I have been really surprised by how irresponsible our society has become—especially in the highschool and college venue.  Twenty-five years ago, my professors didn’t take excuses, you just got a zero.  Now high schoolers and college students can talk their way into extensions and prompting the answer to test questions from the instructor and other forms of CHEATING.  From what I hear, cheating is a real problem in high schools and colleges everywhere.  Apparently it’s a problem in the work force as well.  I think cheating is a form of being irresponsible.


Responsibility and other character issues will be taught by me to my own children now, and the children in my care when I am a teacher.  In the 1990’s, Character Education became important to many Americans.  There was even a movement—I remember getting these great little books and tapes on different character traits every time we went to Chick-Fil-A for kid’s meals.  (I believe there was an immoral president in office at the time?) 

Responsibility is a character trait that I feel needs more emphasis in schools since fewer children attend church regularly and have a very good chance of not being taught responsibility at home.  In a recent education class to recertify, I learned something new about teaching children responsible behavior. 

It was so exciting I immediately made a chart to use in my future class.  Hellison (2011) is cited in the textbook, Dynamic Physical Education for Elementary School Children (Robert P. Pangrazi and Aaron Beighle 2013).  On pages 108-110, the text gives a very good breakdown of his hierarchy of responsible behavior we can teach children.  I found this very enlightening for myself even! 

I’m sharing the chart I created with my D.J. Inker’s Dazzle Daze (2000) graphics I bought (I love her artwork!)  I had a little Family Home Evening lesson with the family and gave each of them a handout with the hierarchy of responsible behavior.  Then I also permanently displayed the chart on the front door.  We discussed what each level beginning with 0 would look like in real life and gave real examples.  Then we judged where we might be on this scale.  It’s a very real possibility that in different aspects of our lives we could be in more than one place.  The goal is to accomplish all levels leading up to the highest as the most desirable responsibility traits to attain.  Of course there might be setbacks to overcome.  I tried to put the chart in terms that even First Graders could relate to and understand.

Hierarchy of Responsible Behavior Printable

How do you help your children learn responsibility and do you think people are becoming less responsible in today's world than they were even a decade or two ago?

Monday, February 18, 2013

Foil Packet Dinners

Served with just regular old Wonder Bread or buttery Texas toast, this is my go-to meal.  My 17-year-old son LOVES this rendition of barbecued chicken and so does my pocket book!  I like to collect foil packet dinners for camping, but I end up making this meal all the time ‘cause it’s so easy and inexpensive.  Instead of individual packets, I throw the whole thing in a large pan and wrap tightly with foil.  You can increase or decrease the portions as you like or use chicken thighs as well as legs.  Heck, throw in a few wings. 


My favorite inexpensive sauce is Kraft’s Spicy Honey BBQ Sauce.  I also like to cook the meal a full hour ‘cause a lot of us Southerners believe in slow-cooking our barbecue.  (You can turn the oven down a little if you like).  Try this hearty, finger-lickin’ meal and see if you don’t join our fan club!  P.S.  I never defrost the corn on the cob and it turns out great every time!

Are you a fan of foil packets too?  What are your favorite ways of using aluminum foil when cooking?

Barbecued Chicken in Foil printable
8 chicken legs                                                    2 T. butter, melted
4 small ears frozen corn, thawed                      ½ c. barbecue sauce
1 t. salt                                                               1 (15-oz.) can pinto beans, rinsed and drained
½ t. pepper                                                     
Toppings: barbecue sauce, shredded Cheddar cheese, chopped green onions
This recipe can be done as follows (which is great for campouts!) or when I do this at home, I put everything in my largest pan and wrap the top tightly with foil.  This recipe also doubles very well!
Tear off 4 (18 x 12 inch) sheets of heavy duty aluminum foil; lightly grease 1 side of each.  Place 2 chicken legs and 1 ear of corn in center on lightly greased side of each foil sheet.  Sprinkle evenly with salt and pepper; drizzle corn evenly with butter.  Spoon barbecue sauce evenly over chicken; top evenly with beans.  Bring together 2 sides of each foil sheet over ingredients, and double fold with about 1-inch-wide folds.  Double fold each end to form a packet, leaving room for heat circulation inside packet.  Place packets on a baking sheet.  Bake at 450 degrees for 40 minutes.  Carefully open packets to prevent burns from hot steam.  Serve with desired toppings.

LinkWithin

Related Posts Plugin for WordPress, Blogger...