Showing posts with label camping. Show all posts

Monday, February 18, 2013

Foil Packet Dinners

Served with just regular old Wonder Bread or buttery Texas toast, this is my go-to meal.  My 17-year-old son LOVES this rendition of barbecued chicken and so does my pocket book!  I like to collect foil packet dinners for camping, but I end up making this meal all the time ‘cause it’s so easy and inexpensive.  Instead of individual packets, I throw the whole thing in a large pan and wrap tightly with foil.  You can increase or decrease the portions as you like or use chicken thighs as well as legs.  Heck, throw in a few wings. 


My favorite inexpensive sauce is Kraft’s Spicy Honey BBQ Sauce.  I also like to cook the meal a full hour ‘cause a lot of us Southerners believe in slow-cooking our barbecue.  (You can turn the oven down a little if you like).  Try this hearty, finger-lickin’ meal and see if you don’t join our fan club!  P.S.  I never defrost the corn on the cob and it turns out great every time!

Are you a fan of foil packets too?  What are your favorite ways of using aluminum foil when cooking?

Barbecued Chicken in Foil printable
8 chicken legs                                                    2 T. butter, melted
4 small ears frozen corn, thawed                      ½ c. barbecue sauce
1 t. salt                                                               1 (15-oz.) can pinto beans, rinsed and drained
½ t. pepper                                                     
Toppings: barbecue sauce, shredded Cheddar cheese, chopped green onions
This recipe can be done as follows (which is great for campouts!) or when I do this at home, I put everything in my largest pan and wrap the top tightly with foil.  This recipe also doubles very well!
Tear off 4 (18 x 12 inch) sheets of heavy duty aluminum foil; lightly grease 1 side of each.  Place 2 chicken legs and 1 ear of corn in center on lightly greased side of each foil sheet.  Sprinkle evenly with salt and pepper; drizzle corn evenly with butter.  Spoon barbecue sauce evenly over chicken; top evenly with beans.  Bring together 2 sides of each foil sheet over ingredients, and double fold with about 1-inch-wide folds.  Double fold each end to form a packet, leaving room for heat circulation inside packet.  Place packets on a baking sheet.  Bake at 450 degrees for 40 minutes.  Carefully open packets to prevent burns from hot steam.  Serve with desired toppings.

Monday, October 1, 2012

Simple Oktoberfest Family Meal


This meal can be cooked over an open fire or right in the oven.  Be sure to use a pan to catch possible drippings if you cook in the oven.  A great way to enjoy a beautiful fall evening at home or camping.  Print Recipe

Simple Oktoberfest Family Meal
1 lg. sweet onion, sliced
3 lg. bell peppers:  green, red, and yellow
4 medium potatoes, sliced 1/2-inch thick
6 medium carrots, sliced 1/4-inch thick
1 small cabbage, sliced
2 medium tomatoes, chopped
1 to 1-1/2 lb. cooked Polish sausage
1/2 c. butter or margarine
1 t. salt
1/2 t. pepper
Place onion, peppers, potatoes, carrots, cabbage and tomatoes on three pieces of double-layered heavy-duty foil (about 18 x 18-inch).  Cut sausage into 1/2-inch pieces and add to foil; dot with butter.  Sprinkle with salt and pepper.  Fold foil around the mixture and seal tightly.  Grill, covered, over medium coals for 30 minutes.  Turn and grill 30 minutes longer or until vegetables are tender, (if you open bundles to check, be careful of steam escaping, and carefully fold back if more time is needed, so they don't leak).  Yield:  6 servings.

Tuesday, January 31, 2012

Young Women's Camp

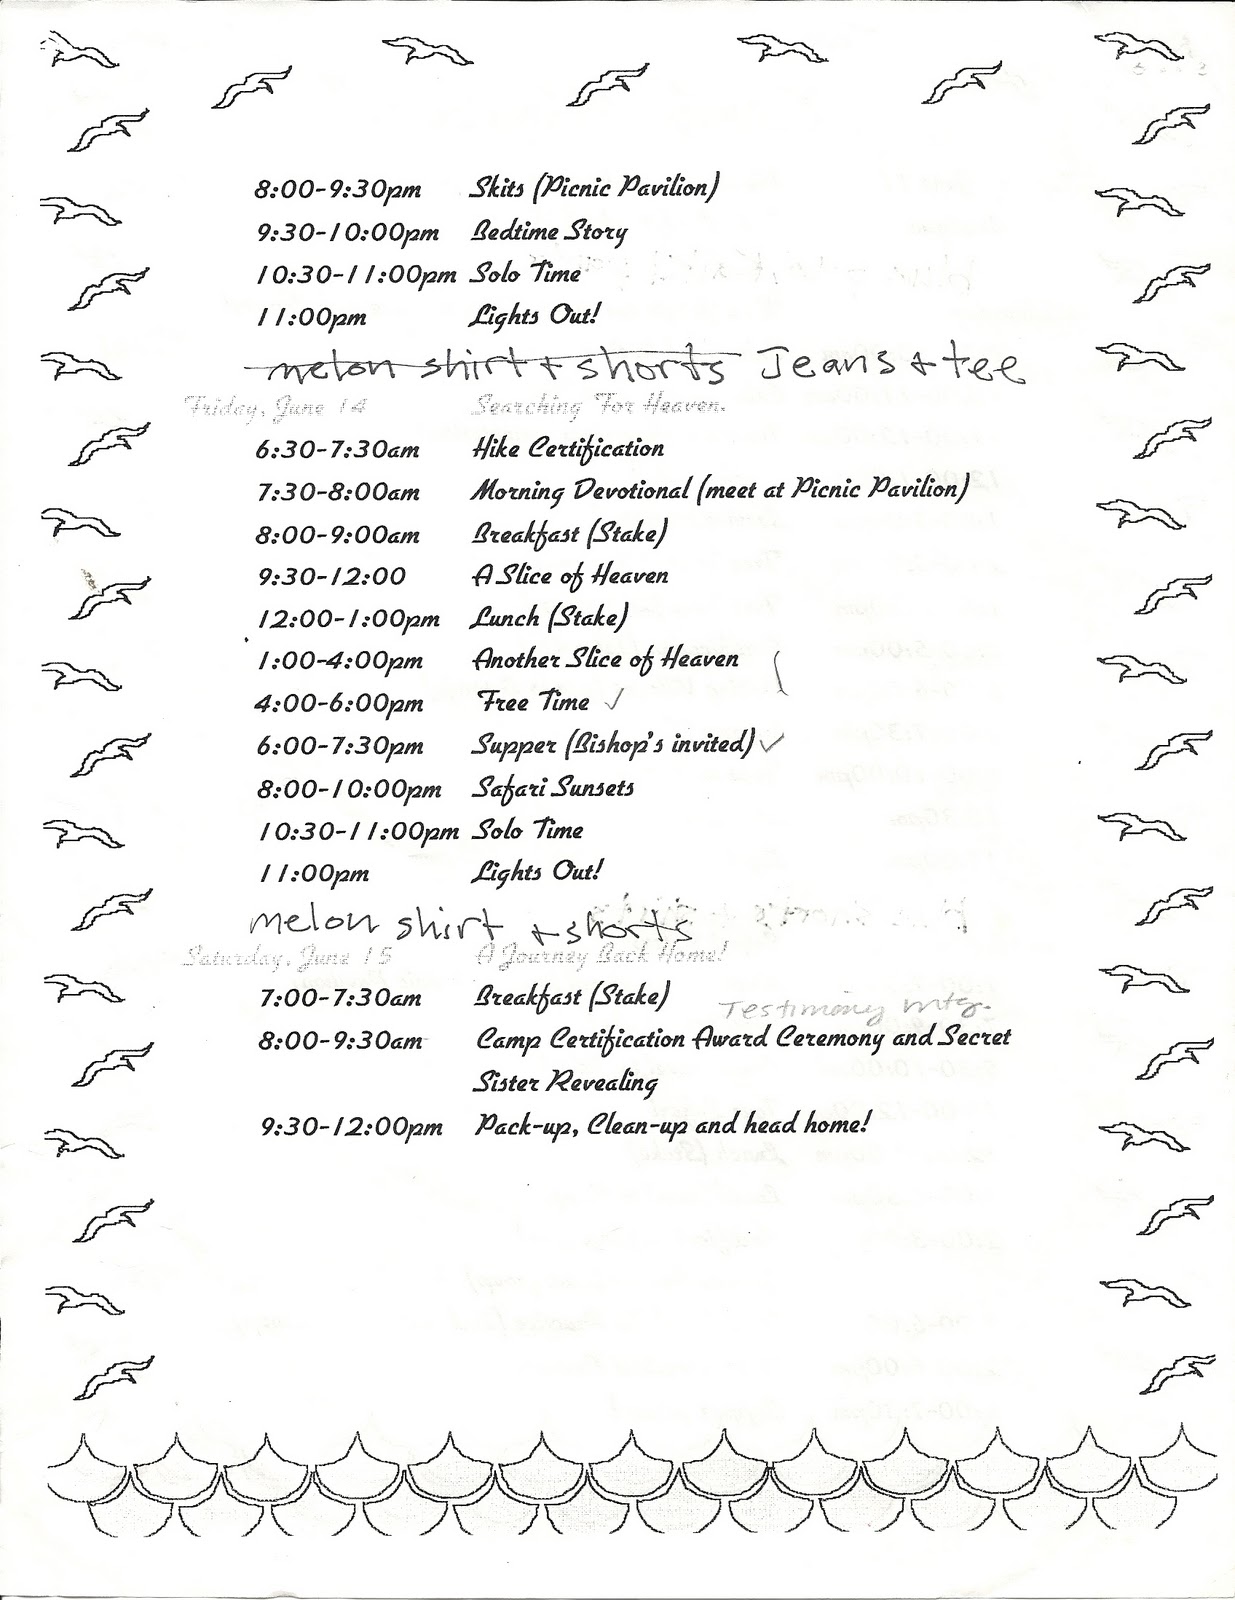
We used to donate a homemade quilt at Girls' Camp each year in our current stake.  It was the best service project!  Below is the first Girls Camp Schedule that my oldest daughter attended.  It was a S.A.F.A.R.I. theme (Stand As Faithful And Righteous Individuals) and was held at a state park in Georgia near an actual safari park with exotic animals.  I always loved going to state parks and girl scout camps for Girls Camp.  It was fun to see other locations to camp at.  This camp was well-organized combining the traditional with a new twist.  It's a nice memento and might be useful to others.  
Here's some camp songs.

I recorded these fun YW Camp crafts here in case the link ends up missing from http://www.christysclipart.com  Even though my own girls never did these particular crafts at Girls Camp, we still got to do them at home.  I've been a fan of Christy's sight for maybe ten years! 

YW Value Matches:  Using crayon wax, dip "strike anywhere" matches in the colors of the Young Women Values and put in ziploc snack baggies with this poem attached:  "In my hands I hold a match whose flame is small to see.  And if I give but one light to you, my life is filled for me.  But...In your hand you hold a torch for many eyes to see.  So hold it high that they may light their candlewicks from thee." 

YW Theme Shelf Sitter - Value Experience 6 (Christy's Y.W. Pages) 
Purchase a 4" x 4" post.  Have the folks at the hardware or lumber store cut it into 4" lengths.  Sand the sides and corners of each cube.
On the night of the activity, have the girls paint their blocks one of their favorite colors, using acrylic craft paints (they dry faster).  You can dilute the paints and do a dry brush "wash" effect, or a pickling effect by putting the paint on then rubbing parts off.
As the blocks dry, have a short lesson on the YW theme, and what different parts mean.
When the base coat is dry, the fun begins.  You can have stencils, patterns, images (to decoupage) and sandpaper ready.  Have the girls paint the words to portions of the theme on each side of the block.
1. Sacred Covenants
2. Stand as a Witness
3. Strengthen Home and Family
4. Receive Ordinances of the Temple
5. Blessings of Exhalation
6. We are Daughters of Our Heavenly Father
When the painting is done, use the sandpaper to rough the edges, and age the blocks.  You can also add a light coat of stain to age them even more.
During the week, the YW can have a different part of the theme showing for each day simply by turning their shelf sitters.


Hobby Lobby Sample
Fabric Scrap Flip Flops in the Young Women Value Colors
flip flops
bandannas in value colors
Pinking shears
Trim off the hemmed edges of each bandanna.  Cut 1" x "8 pieces from the bandannas.  Use pinking shears to trim around each piece.  Wrap the pieces around the straps of the shoes and tie a knot.  Alternate the colors and push close together to make fuller.  Repeat until both straps are covered.

 Sample Stake Girls Camp Itinerary 
GoogleDocs:
Scribd:


See Also:

Thursday, December 29, 2011

Blog Index, page 2

Provident Living
Disaster Preparedness
Alabama's Worst Storm Ever
Real Food Storage Resources (not MREs)

Camping
Girl Scouts
  SWAPS
  Girl Scout Favorite Things
  Camping, part 1 (Camp Songs)
Young Women Camp (i.e. Girls' Camp)
Southern State Parks
  Southern Reflections, Camping part 3
  Monte Sano, Huntsville, AL

Gardening
Freezing Herbs
And the Lord Planted a Garden ... Gen. 2:8
How to Make a Compost Heap
Freezing Blueberries
How to Care for House Plants
Rx for Houseplants
Nesting, It's A Chick Thing Book Review
(especially about taking care of after-gardening hands)

Once-A-Month-Cooking (OAMC)
Freezing a Batch of Soup
Relief Society OAMC Activity
Ham Dinner Slices
Freezer Slice and Bake Cookies
How to Freeze Grated Cheese

Food
Hamburger Gravy Over Rice
Quick Creamed Chicken and Rice
Cooking 101:  Substitutions for Wine and Liquor
No Whine Meal Time
Zesty Tomato Soup
Mellow Meals
Old and New Favorite Recipes
Gobble Good Turkey Casserole!
So Easy Granola
Kid-FRIENDly Meals
The Legacy of Meal Planning, 2
Honey Wheat Muffins
Pearly Shell Chicken Salad
Weight Watchers Four Ingredient 10 Minute Recipes
Three Day Chili
The Best and Prettiest Slaw
Steve's Perfect Sweet Potato Pie
The Best Banana Bread Recipe
Feels Like Christmas Pecan Mocha Fudge
For Seasoned Cooks
Chicken Pillows (aka Chicken Packets)
Poultry Seasoning Mix
Chicken Divine (Broccoli)
Bean Chimichangas (Baked)
Writing My Own Cookbook
Teaching Children to Cook
Christmas Coffee Cake
Peanut Butterscotch Morsels
Yankee Corn Sticks
Creamy Italian Dressing in a Jiffy!
Tater Tot Casserole
Quick and Easy Bierocks
The Lady's Chicken Nuggets
Buttermilk Blueberry Pancakes
Vancouver's Best Salad and Jiffy Pizza Sticks
George Foreman Grill
Foil Packet Dinners
Perfect, Easy Biscuits
Quick Mix Sausage Balls
Pinterest Recipes I've Tried (and my adaptations)
Vintage 1941 Chocolate Chip Cookies
Vintage Desserts: Brownie Pudding
Favorite Store-Bought Baking Mixes
Homemade Chocolate Covered Cherries
Quick and Easy Piping Bag for Gingerbread Cookies (White Frosting)
How to Make Meatballs the Same Size
Quick Starts to Your Family's Day

Dinner

Wednesday, December 28, 2011

Blog Book Index

To the past, the present, and the future, I dedicate this book.  To the past because I came out of it, to the present because I live in it, to the future because my children shall inherit it. ~Ruth May Fox

Create
Sewing
Homemaker's Must-Have Apron
Learn Something New This Summer:  Cross-Stitch in 5 Minutes
Easy Hats to Sew Gift (beginners)
Fruit Basket Liners
Kitty Cross-Stitch Sampler (show and tell)
Retro Yo-Yo Quilts
T-Shirt Quilt Tutorials

Pioneer Crafts
Pioneer Day Posts
Clove-Studded Fruit
Old-Timey Button String and Bracelet
Star-Spangled Shelf Paper
Pioneer Rag Dolls
Corn Husk Dolls
Yarn Dolls
Pioneer Handkerchief Dolls
Pioneer Chick Lit
Children's Pioneer Recipes
Flip Over Old Fashioned Games
Children's Pioneer Day Event
A New Twist on Pioneer Hay Sticks
Achievement Days Book Review: Sarah, Plain and Tall
Achievement Days Country Fair
Pioneer Children
CopyCat Magazine Little House Unit
Pioneer Day Toy
Native American Culture Activities for Kids

Camping Crafts
Swaps:  Some Favorite Campy Things, camping part 2
Fabric Scrap Flip Flops (YW colors):  camping part 1
YW Theme Shelf Sitter:  camping part 1
YW Value (water-proof) Matches:  camping part 1
Young Women's Camp

Seasonal
Winter
Christmas
  Snowman Soup Gift:  Christmas traditions, part 4
  Pinecone Fire Starters Gift: Christmas traditions, part 3
  Wrapping Gifts and Making Bows
  Paper Snowflakes Decorations: Christmas traditions, part 3
  Wooly Sheep Ornament: Christmas traditions, part 3
  Santa's List Ornament: Christmas traditions, part 3
  Rudolph the Paper Reindeer Decoration: Christmas traditions, part 3
  Countdown to Christmas Craft
  Applesauce Cinnamon Cutout Ornaments
  Christmas Pageant
  Cookie Tea (Exchange)
  Red-Hots Crock Pot Cider
  SpaRific Bath Mixes to Give
  Candy Cane Reindeer Ornaments
  Retro Christmas Stockings
  Fragrant Vintage Ornaments
  Festive Fruit Basket Liners
  Natural Angel Ornaments
  Christmas Coffee Cake
  Snow-Couple Bell Ornament
  Homemade Chocolate Covered Cherries
  Quick and Easy Piping Bag for Gingerbread Cookies (White Frosting)
St. Patrick's Day
  St. Patty's Day Family Night

Spring
Easter
  Bird's Nests and Jelly Bean Poem
  Boo Boo Easter Bunnies
  Easter Games
  Resurrection Eggs
Senior Tea
Mother's Day
  Bath Potpourri "Tea" Bags
  Mom Mix

Summer
Relaxation
  Active Meditation for Serious Relaxation
  Spirit Soothers
  Scents that Soothe
  Aromatherapy Bath Potpourri "Tea" Bags
  Meditation Made Easy
Big Fish Book Review (commemorate Dad by
reading the book or watching the movie on Father's Day)
Favorite Fourth of July Traditions
Origami Earrings
Chick Lit for July
Crystal Garden
Old Fashioned Travel Games
Jello Popsicles and Kool-Aid Playdough

Autumn
Trick or Treat Family Night Idea
October Traditions: Fun with Cookies
October Traditions: Chicklit, Songs, Activities
October Traditions: Autumn Days
Boys Like to Dress Up Too!
Better Than Potpourri Brew
November Traditions
Simple Oktoberfest Family Meal (foil cooking)
Fall Fun
When There's Nothing Else to Eat (leftover turkey salad)

Thursday, December 15, 2011

Homemade Firestarters


Homemade firestarters work really great!  You'll have a blazing fire in no time.  First is a tutorial for an easy way to recycle egg crates, candle wax, and dryer lint into firestarters.  Next, are the instructions for using pinecones from the yard to dip in scented candle wax and give as a gift basket.


Save cardboard egg cartons and keep one nearby the dryer when cleaning out the lint.  Place the lint in each egg opening.


I use stubs of candles and leftover candle wax.  Place them in a metal can inside a pan of boiling water.


When the wax is melted, pour it over the lint so that it soaks thoroughly.  They are easy to tear apart when you need to build a fire.

(photo from Gooseberry Patch Christmas 3, p. 52)
One thing we have plenty of around our house are pinecones.  These can be dipped in leftover candle wax that's already tinted to make a lovely fireside gift.  To de-critter, be sure to bake the pinecones on a foil-lined cookie sheet.  Space the pinecones evenly and bake for 35-45 min. at 250 degrees.  Watch carefully and handle with care.  Do not use for 24 hours.

Pinecone Firestarters Gift
Red or green wax dye (optional) 
Paraffin
"Christmas" scented oil (optional)
(or instead of the first three items, use leftover Scentsy or candle wax that's already scented and dyed)
Double boiler
Dry pinecones, free of any sap residue (see baking instructions above)
Wire or candle wicking
1.  Heat wax or paraffin in a double boiler to approximately 140 degrees.
2.  Hook a short length of wire onto pinecone.
3.  Holding wire, carefully dip pinecone into hot wax.
4.  Set pinecone on its base, and allow to cool and dry for a few hours before using.

Friday, August 5, 2011

How to Love Scouts


By the time my daughters were in Young Womens at our church, my son was beginning Scouts.  Before that, I did  Tiger Scouts with him on our own because we couldn't find a troop in our area.  This worked out fine for us because we were starting to homeschool kindergarten and I treated Tiger Scouts like another subject with fun field trips the whole family took together.  I wish I would have thought to take pictures of this but since we were not in a troop it didn't occur to me.  They wore orange shirts with matching caps.


When Bryce began Cub Scouts, I made sure the leader had something Bryce had accomplished at home to record at each meeting.  Next thing I knew, I was called to be the Cub Scout Leader for our church Cub Scouts.  We went on field trips, but mostly I helped the boys get caught up and advance.  At one family meeting there was a fun obstacle course to complete in the gym.  We did a Cake Bake where father and sons (without the help of a female) made and presented a cake and held it out at the church pavilion.  Everyone received an award.


We also had a Court of Awards where I went all out on the decorations!  I made these lanterns as centerpieces and used them at several Court of Awards.  They were made with painted Popsicle sticks and wax paper with fleur de lis (Boy Scout symbol) cut-outs on each side.  This was the second time they were used.  I used battery operated tea candles to light them.  I found all kinds of ideas just by Googling Cub Scout decorations.

When my son was in Cub Scouts, they really encouraged families to be involved.  This is a recipe holder that Bryce made with his dad's help.  I've used it ever since!

When planning a Scout meeting of any kind, I always tried to fill the entire time (60-90 minutes) and even practiced the activities ahead of time.  Because of this, most meetings (involving several short activities) transitioned smoothly and kept the boys from becoming restless.  See MORE of my Boy Scout photo gallery by clicking on Read more...


This layout shows a box car rally and field trip to a local fire house that the recent tornadoes just demolished!  There's also pics from our Blue and Gold Banquet.


Here's the Cake Bake and Relay Race from two separate family events.

This shows the boys at the Stake Raingutter Regatta and the second Blue and Gold Banquet that I did.

My husband took Bryce and Sam to the last Cub Scout event before they turned eleven and became Boy Scouts.

Rickwood Caverns is a great place for a Boy Scout over-nighter (just get permission from the Boy Scout office first!)  There are caverns to tour, a pool, group primitive camping, lots of pavilions, etc.  Here Bryce and Sam are working on many beginning requirements such as lashing, swimming, cooking, etc.  They also went to their first Boy Scout Camp near Mentone, Alabama at Top of the Mountain.  Those are the top three pictures of this two-page layout.


My husband took advantage (with a little help from moi), of all the camping opportunities for new scouts.  The stake had an 11-yr.-old campout that Sam and Bryce went to and were able to sign off quite a few requirements!

Chief Ladiga Trail in Cleburn County, Alabama is such a great place to do Cycling Badge.  They guys loaded up their bikes and headed out on several trips to the trail to finish a total of 50 miles!  They're legs looked awesome (see below pic!).

Winter Camp (right after Christmas) is a good time to get those badges that can be completed at camp (so Mom doesn't have to help you finish them at home!)  I never minded my husband taking the guys to camp (using up rare vacation time) to spend quality time with his boy and helping the other young men from church advance in Scouting.

My husband had volunteered to be the Scout Master because otherwise they weren't planning on doing Scouts--just in time for my son to become a Scout!  Apparently, not too many people at our church do 11 yr. old Scouts, even though the Stake has an event for them.  So with my help (record-keeping), my husband took on not only the new guys like Bryce and Sam but anyone else who wanted to do Scouts.  There were only a handful of us--believe it or not only 3 families!


Spencer's dad volunteered to go to summer camp and ended up writing the skit our troop was to do.  It sounded like they were very successful.  They did pretty much everything you could do at Camp Sequoyah near Mt. Cheaha.  Before they went, we did a preclinic were we got some Camping Badge and other requirements completed (see top three photos, left page).  In fact the Young Women actually ended up attending this as well.

Wednesday, August 3, 2011

Young Women Favorite Things


Even though a lot of Personal Progress requirements can be accomplished as a group in Young Women's, some have to be done at home.  It's always nice when family members help and share with these experiences.  A favorite YW site to begin with is Christy's Young Women Pages, (also known as Christy's Clipart).

The schedule to this YW camp can be found at my post:  Camping, part 1.  The girls camped at one of our family's favorite Georgia State Parks:   F.D. Roosevelt.  They visited the nearby attraction, Wild Animal Safari in Pine Mountain, Georgia.


I wish more of these were kept short and sweet!  With lots of food!!!


I was so disappointed when I went to my first YW camp.  I finally skipped the third year (and had to make it up later), because I expected to really do some camping!!!  Like hikes that were in picturesque locations and fun instead of drudgery.  I wanted to cook real food over an open fire--not just make s'mores.  Most years it was down-right boring--no camp songs, no wide games, no time to make friends.  That's why, even though I was never a Girl Scout, I became a Girl Scout leader where I learned all of the things I always felt were lacking from YW Camp (not the YW Relief Societyish Retreat that they have now become)!  At least my daughters got to do the things (and me too) that I had always wanted to do in Young Women's.  At my post, Camping, part 1, you'll find recipes, etc. for YW or Girl Scouts.


See my post, Camping, part 1, for YW craft ideas.  They never did these at our YW camps so we had fun doing these crafts over the summer at home.

See my post for beautiful knitted hangers that the young women might enjoy learning to make:  Active Meditation.  The shown hangers were store-bought and presented to the young women at a Stake New Beginnings.  There was a poem about wearing a white dress at the girls' temple marriages.

Saturday, July 30, 2011

Girl Scout Favorite Things


HJournal wishes Girl Scouts a HAPPY 100th ANNIVERSARY ;-)  (3/12) These illustrations are from the Girl Scout Handbook, circa 1949 and Cadette Girl Scout Handbook, circa 1963.  I was hoping this post might be of interest to fellow Girl Scouts enthusiasts.  It's kind of a collection of my favorite Girl Scout Memoirs.  I also like to collect old Girl Scout and Boy Scout books and memorabilia.  


Parades
I was in charge of the t-shirts for our local Girl Scouts.  They might be plain, but they hadn't made t-shirts in a few years and I really didn't have anything to go by.  We had them in time for the Peanut Festival Parade, Dothan, Alabama (fall 2000).  Our first parade was the Peanut Festival Parade in the fall of 1998.  Shown with Mrs. Alabama and in the second photo--our troop leaders:  me and Mrs. Lolley.


Then we moved north to Ozark and my troop and a sister troop sponge painted sweatshirts (a badge requirement of course!) for the Christmas Parade '01.

Thinking Day
My husband helped us by cutting the Eiffel Tower out of cardboard.  Then he lit it up with Christmas tree lights. It was a sight to behold in the dark.  I had my girls make the display for a homeschool project.  I found striped fabric with France's flag colors.  I helped with one Thinking Day '01 and made these "passports" for the girls to get stamped at each troop's booth.  Every troop had a different country.  I remember we did Ireland and France.  We actually had a girl from Ireland in our troop.  She was my daughter's best friend.  We gave a Bon Bon candy to each "visitor" to our France booth (Feb. 2002).


Patches and Badges


My co-leader, J. Lolley, came up with this cute idea for our Daisies' and Brownies for a simple uniform.  We decided not to use the Daisy smocks.  That's why I put all of Elise's patches on a banner (shown above).
One of the girls from our troop, actually won the G.S. card design contest for our district.  Woo Hoo :0)


Uniforms
I worked real hard with the parents to make sure the Try-its and official insignia were properly placed.  With kids, it's real important to receive badges as soon as possible.  It's not practical to have a full-blown ceremony every single meeting so we would announce at least two ceremonies a year and lock in the date.  Badges earned in between those dates would be recognized as part of a regular meeting and the girls could go ahead and get them on their sashes.


I really wanted the girls to learn to sew on their own badges once they became Juniors.  Occasionally we would use meetings to go over this.  The girls were given needles and corresponding thread and we would sit in a circle on the floor while I went around to show each girl how to sew them on and give them help if needed.  If there were a lot of badges to put on, I would sew them on myself rather than let them get lost.  I rarely had to reorder badges because of this.


Activities
Every year we asked the girls what they wanted to use their cookie money for and the number one answer was, "Go to the Beach!!!"  We never did do that, (except when we lived in Port St. Lucie-2000!)  but we did use the money for practical things like going to Girl Scout Camps as a troop to earn badges.  And of course we had parties.  We went on a trip to Florida Caverns State Park, Mariana, FL which is close to Dothan.  

Our troop did a lot of activities at Landmark Park in Dothan, Alabama.  My Daisies and I were actually asked to be in a Girl Scout commercial for Alabama and it was filmed at Landmark Park!  This was taken at Girl Scout Day at Landmark.  Little Brother was a tagalong to many Girl Scout functions.  We also gave service to Landmark Park '02 when we showed guests how to make Cornhusk Dolls.  In 1998, the Dothan troop planted daylillies  at the elementary school's garden (shown on bridge).


Making Corn Husk Dolls
Meetings
Meetings were usually held at a church or a leader's home.  Most of the ones in Ozark were held at my home 2001-2002, but when we needed more room to make quilts for the children's hospital we held meetings at the local library's meeting room.


Swaps Collection
Swaps are small crafts that G.S. give as gifts or trade with other scouts.  They are sometimes referred to as potlatch.  Their origin is Native American.  POTLATCH is the ceremonial exchange of gifts practiced by Native Americans of Northwest Coast tribes. The custom stems from the legend explaining why birds have colored feathers.  As the story goes, two Indian girls plucked feathers of a magic bird and distributed the multicolored plumage to the colorless birds living in the forest.  From that time on, birds have had brightly colored feathers, and those gifts were remembered at potlatch ceremonies.
Swaps can be simple or complex, cheap or expensive, whatever the maker desires.  Each girl needs to decide how many swaps she wants to make.  This is the same number she will receive.  Larger troops may want to make several kinds of swaps so that the girls will have more opportunities to trade.  Probably 10-15 per girl is a good number to aim for.
Swaps can be made during a troop meeting, during a special meeting called for the express purpose of making swaps, or examples shown at the meeting, with the swaps to be made at home.  One suggestion,which might be helpful for younger gilrs, is to have a mother/daughter evening to mass produce the swaps in one night.
You can demonstrate some of the ideas listed below, or just provide an assortment of beads, ribbons, felt, pipe cleaners, etc. and let their imaginations run wild.  Or you may want to have your group plan a swap and then consider the cost, materials needed, how long it will take, etc.  Swaps are usually only an inch or two in size and attach with a safety pin.  Traditionally they are pinned on a swap hat.  This hat could be part of your troop identificationNall a certain color, with troop number decorated on with fabric paints.
On the day of the swap, each girl will come with a shoebox (or something) with her swaps in it, and will mingle with other girls, trading her swaps for others that interest her.  Hopefully, the swaps will have small safety pins attached and can be pinned to a swap hat or jacket.  Leaders may want to come prepared with a few extra swaps for girls who were absent when they were made.
Why swap?  To promote friendship.  To learn to talk to other people.  To have mementos of a good time.  To share our handiwork with other scouts.  Girls on wider opportunities and adults at national meetings swap patches and handmade items.  These often reflect the area the scout lives in.  Camp swapping is a great background for this.  (This was found on the internet many moons ago!)

I have a few more Swaps shown at my post: Some Favorite Campy Things.

First Aid Kit
Autograph Book

Bed Roll
Buddy Burner
Caterpillar
Clover
American Flag
Friendship Knot
Mess Kit
Peppermint
Peanut Baby
Pretzel
Scottish Bonnet
Warm Fuzzy
S'more

LinkWithin

Related Posts Plugin for WordPress, Blogger...