Showing posts with label create. Show all posts

Monday, June 2, 2014

T-Shirt Quilt Tutorials

I made my oldest daughter a t-shirt quilt when she graduated highschool in 2008.  That was way before Pinterest, and all I knew about these quilts was a little blip I had read in Country Woman Magazine.  


What I decided to do since I was a novice quilter, was to use kid-friendly quilting instructions found in "I Can Quilt!" by Sandra L. Hatch and Sue Harvey.  The quilt shown is from Lesson 7, Four-Patch Fun Quilt.  We have used this pattern to make quilts to give to children's hospitals and children in other countries.  I highly recommend this book for new quilters or for kids learning to quilt.


I have two other children I would like to sew t-shirt quilts for and so I began Pinning tutorials to try.  Here is my collection of t-shirt quilt tutorials on Pinterest so far:


I would really like to grow this collection of links so if anyone knows of any good sources for t-shirt quilt tutorials or just good photos, please let me know :-)

Saturday, August 31, 2013

Retro Yo-Yo Quilts

Here's what you can do with all those little bitty pieces of fabric you have left over from sewing projects.  It's a yo-yo quilt!  Yo-yo quilts became popular during the Great Depression, and I fell in love with them from the first time I saw a yo-yo quilt.  Making yo-yos are great because you can take the materials in a little baggy in your purse and sew no matter where you are--even in church (yes, it's true)!  You can make pillow covers, table runners, coasters, decoration for a guest towel...the possibilities are endless!


Quilts Can Represent a Lifetime

My throw may not look like much but it means a lot to me because each yo-yo represents an outfit or project I sewed for my family over the last twenty-five years.  My original inspiration came from a photo in Better Homes and Gardens (I think?).  This clipping is beat up cause it was kept in my idea notebook and referred to often.

Probably published in Better Homes and Gardens many moons ago.

Yo-yos Are Easy to Make

I just kept the quilt in a storage box and added onto it as I had more yo-yos and yo-yo squares completed.  I found the instructions for yo-yo quilting in an old craft book from the library, and I'm sorry to say I didn't keep the source info. on the book :(  I just made myself plenty of circle patterns out of old manila folders I planned on throwing out.  Then I would pin my pattern to leftover scraps of fabric and cut the material out.  This can be done assembly style (all the pinning and cutting done at once) so that the yo-yos are ready to be sewn.  Make them whatever size you want.  Put two yo-yos right sides together and sew a few stitches (whip stitch is fine) to attach them.  Use a thread that will not be too obvious.  I prefer quilting thread for this project because it is a lot stronger than regular thread.

source unknown

Resurgence in Yo-yo Crafts

Yo-yo quilting has become popular again and Hobby Lobby keeps instructions and durable circle patterns in the hand-sewing isle.  Instructions and ideas can be downloaded from their website as well.  This is a great beginning sewing activity for youngsters and my children have really enjoyed having something useful to do while watching television or waiting in the doctor's office.  

I hope you will try yo-yo quilting too.  I invite you to share ways you have used yo-yos in your crafting :)

Wednesday, April 11, 2012

Kitty Cross-Stitch Sampler


Well I finally did it!  Took me from March 2008 to March 2012, but I finished this Kitty cross-stitch.  Hobby Lobby had these cute frames (also in blue, white, etc.)  There's lots of places where I had to fix mistakes so it's not perfect, but it got to the point where I just wanted to finish the darn thing!  Every time I started another project (not cross-stitch :P), I would feel guilty cause this albatross was still not completed.  Now I know why I usually pick mini-samplers...

Tuesday, January 31, 2012

Young Women's Camp

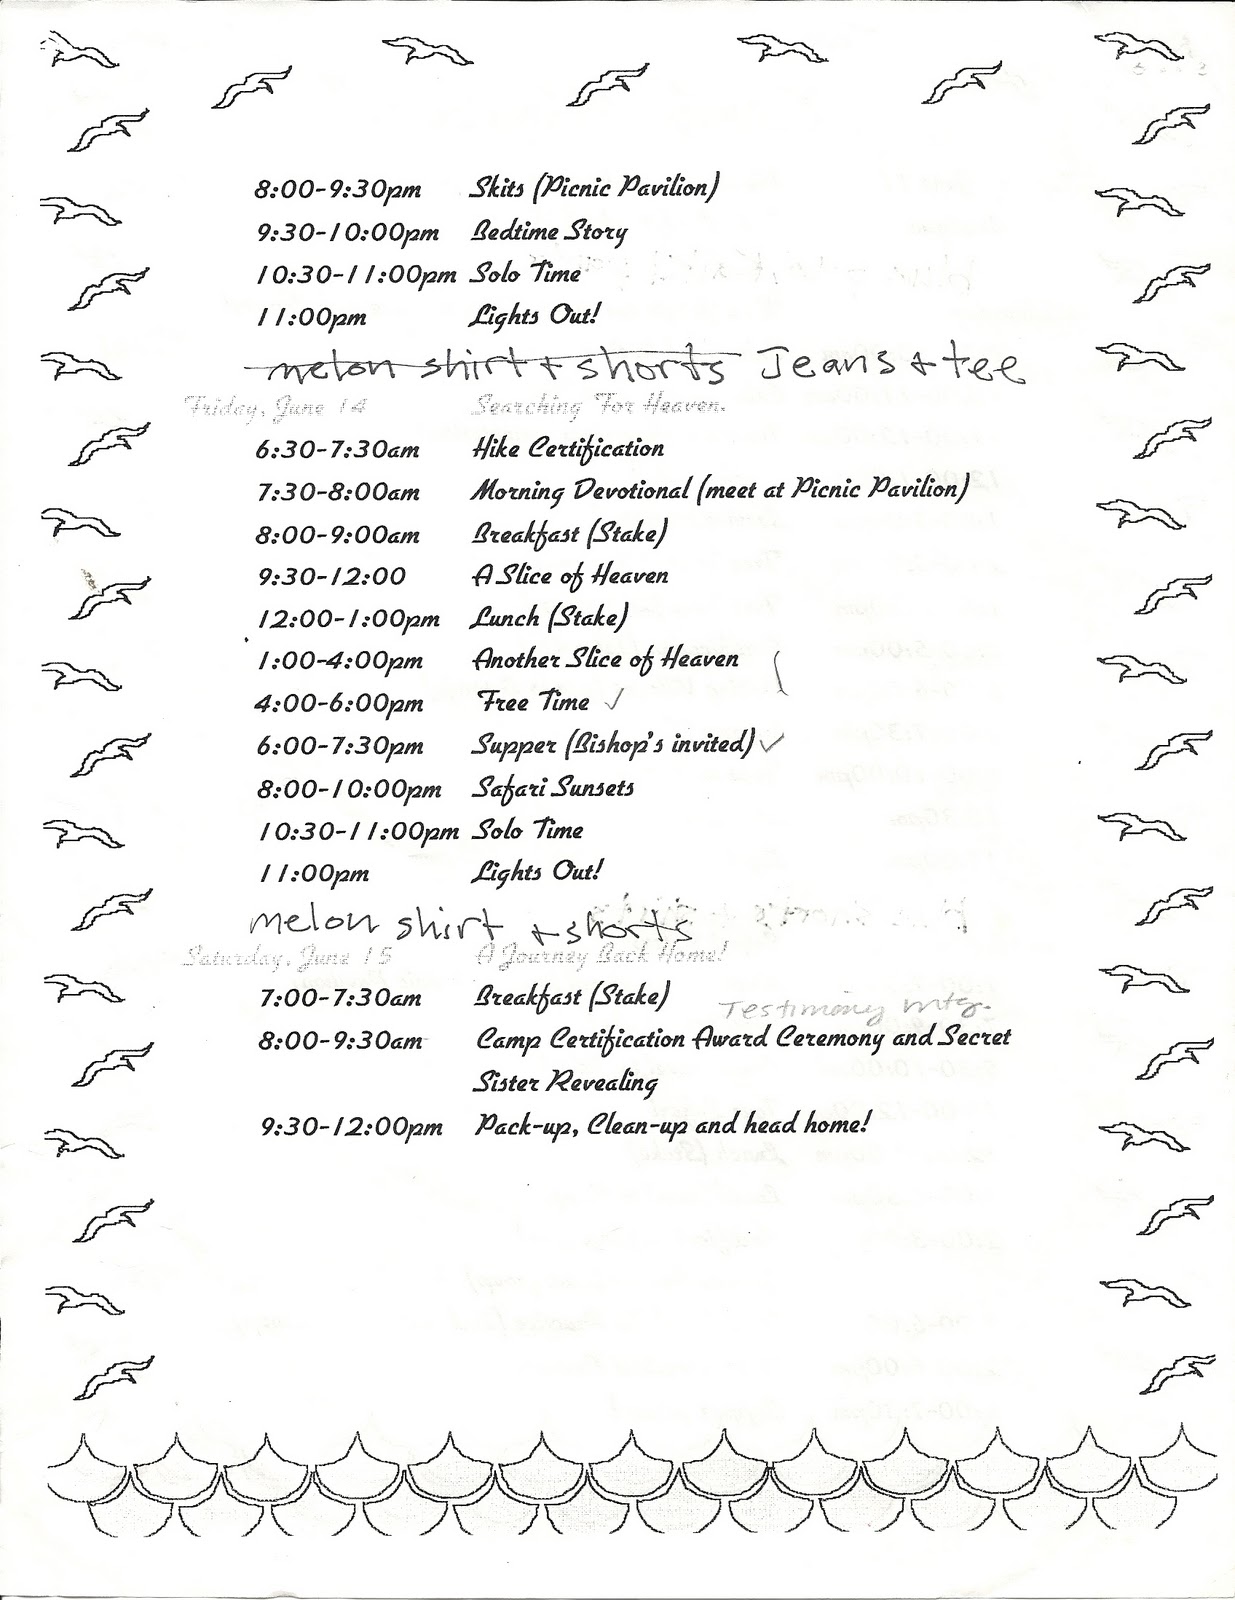
We used to donate a homemade quilt at Girls' Camp each year in our current stake.  It was the best service project!  Below is the first Girls Camp Schedule that my oldest daughter attended.  It was a S.A.F.A.R.I. theme (Stand As Faithful And Righteous Individuals) and was held at a state park in Georgia near an actual safari park with exotic animals.  I always loved going to state parks and girl scout camps for Girls Camp.  It was fun to see other locations to camp at.  This camp was well-organized combining the traditional with a new twist.  It's a nice memento and might be useful to others.  
Here's some camp songs.

I recorded these fun YW Camp crafts here in case the link ends up missing from http://www.christysclipart.com  Even though my own girls never did these particular crafts at Girls Camp, we still got to do them at home.  I've been a fan of Christy's sight for maybe ten years! 

YW Value Matches:  Using crayon wax, dip "strike anywhere" matches in the colors of the Young Women Values and put in ziploc snack baggies with this poem attached:  "In my hands I hold a match whose flame is small to see.  And if I give but one light to you, my life is filled for me.  But...In your hand you hold a torch for many eyes to see.  So hold it high that they may light their candlewicks from thee." 

YW Theme Shelf Sitter - Value Experience 6 (Christy's Y.W. Pages) 
Purchase a 4" x 4" post.  Have the folks at the hardware or lumber store cut it into 4" lengths.  Sand the sides and corners of each cube.
On the night of the activity, have the girls paint their blocks one of their favorite colors, using acrylic craft paints (they dry faster).  You can dilute the paints and do a dry brush "wash" effect, or a pickling effect by putting the paint on then rubbing parts off.
As the blocks dry, have a short lesson on the YW theme, and what different parts mean.
When the base coat is dry, the fun begins.  You can have stencils, patterns, images (to decoupage) and sandpaper ready.  Have the girls paint the words to portions of the theme on each side of the block.
1. Sacred Covenants
2. Stand as a Witness
3. Strengthen Home and Family
4. Receive Ordinances of the Temple
5. Blessings of Exhalation
6. We are Daughters of Our Heavenly Father
When the painting is done, use the sandpaper to rough the edges, and age the blocks.  You can also add a light coat of stain to age them even more.
During the week, the YW can have a different part of the theme showing for each day simply by turning their shelf sitters.


Hobby Lobby Sample
Fabric Scrap Flip Flops in the Young Women Value Colors
flip flops
bandannas in value colors
Pinking shears
Trim off the hemmed edges of each bandanna.  Cut 1" x "8 pieces from the bandannas.  Use pinking shears to trim around each piece.  Wrap the pieces around the straps of the shoes and tie a knot.  Alternate the colors and push close together to make fuller.  Repeat until both straps are covered.

 Sample Stake Girls Camp Itinerary 
GoogleDocs:
Scribd:


See Also:

Wednesday, December 28, 2011

Blog Book Index

To the past, the present, and the future, I dedicate this book.  To the past because I came out of it, to the present because I live in it, to the future because my children shall inherit it. ~Ruth May Fox

Create
Sewing
Homemaker's Must-Have Apron
Learn Something New This Summer:  Cross-Stitch in 5 Minutes
Easy Hats to Sew Gift (beginners)
Fruit Basket Liners
Kitty Cross-Stitch Sampler (show and tell)
Retro Yo-Yo Quilts
T-Shirt Quilt Tutorials

Pioneer Crafts
Pioneer Day Posts
Clove-Studded Fruit
Old-Timey Button String and Bracelet
Star-Spangled Shelf Paper
Pioneer Rag Dolls
Corn Husk Dolls
Yarn Dolls
Pioneer Handkerchief Dolls
Pioneer Chick Lit
Children's Pioneer Recipes
Flip Over Old Fashioned Games
Children's Pioneer Day Event
A New Twist on Pioneer Hay Sticks
Achievement Days Book Review: Sarah, Plain and Tall
Achievement Days Country Fair
Pioneer Children
CopyCat Magazine Little House Unit
Pioneer Day Toy
Native American Culture Activities for Kids

Camping Crafts
Swaps:  Some Favorite Campy Things, camping part 2
Fabric Scrap Flip Flops (YW colors):  camping part 1
YW Theme Shelf Sitter:  camping part 1
YW Value (water-proof) Matches:  camping part 1
Young Women's Camp

Seasonal
Winter
Christmas
  Snowman Soup Gift:  Christmas traditions, part 4
  Pinecone Fire Starters Gift: Christmas traditions, part 3
  Wrapping Gifts and Making Bows
  Paper Snowflakes Decorations: Christmas traditions, part 3
  Wooly Sheep Ornament: Christmas traditions, part 3
  Santa's List Ornament: Christmas traditions, part 3
  Rudolph the Paper Reindeer Decoration: Christmas traditions, part 3
  Countdown to Christmas Craft
  Applesauce Cinnamon Cutout Ornaments
  Christmas Pageant
  Cookie Tea (Exchange)
  Red-Hots Crock Pot Cider
  SpaRific Bath Mixes to Give
  Candy Cane Reindeer Ornaments
  Retro Christmas Stockings
  Fragrant Vintage Ornaments
  Festive Fruit Basket Liners
  Natural Angel Ornaments
  Christmas Coffee Cake
  Snow-Couple Bell Ornament
  Homemade Chocolate Covered Cherries
  Quick and Easy Piping Bag for Gingerbread Cookies (White Frosting)
St. Patrick's Day
  St. Patty's Day Family Night

Spring
Easter
  Bird's Nests and Jelly Bean Poem
  Boo Boo Easter Bunnies
  Easter Games
  Resurrection Eggs
Senior Tea
Mother's Day
  Bath Potpourri "Tea" Bags
  Mom Mix

Summer
Relaxation
  Active Meditation for Serious Relaxation
  Spirit Soothers
  Scents that Soothe
  Aromatherapy Bath Potpourri "Tea" Bags
  Meditation Made Easy
Big Fish Book Review (commemorate Dad by
reading the book or watching the movie on Father's Day)
Favorite Fourth of July Traditions
Origami Earrings
Chick Lit for July
Crystal Garden
Old Fashioned Travel Games
Jello Popsicles and Kool-Aid Playdough

Autumn
Trick or Treat Family Night Idea
October Traditions: Fun with Cookies
October Traditions: Chicklit, Songs, Activities
October Traditions: Autumn Days
Boys Like to Dress Up Too!
Better Than Potpourri Brew
November Traditions
Simple Oktoberfest Family Meal (foil cooking)
Fall Fun
When There's Nothing Else to Eat (leftover turkey salad)

Wednesday, November 30, 2011

Festive Fruit Basket Liners


When I was a teenager we made larger versions of this cute little basket liner for church fruit baskets we helped deliver (using Christmas material of course).  I have given many, many cookie plates and gift baskets throughout the years.  The cookie plates are something my extended family did for each other.  My favorite thing to receive on a cookie plate was Aunt Janice's divinity.

I like to fill my gift baskets with things like homemade mocha fudgefreezer cookiesbanana bread, and candy, fruit, and nuts.  Baskets can be found at stores like Hobby Lobby.  The dimensions for making a pattern of a small basket are 15 x 12.5 inch rectangle, with corners cut out so that you have a long flap of 8 x 4 inches and a shorter flap that is 5 x 3.5 inches.  Happy Giving :0)

Tuesday, July 26, 2011

Clove-Studded Fruit


"Aunt Eliza had brought Ma a large red apple stuck full of cloves.  How good it smelled!  And it would not spoil, for so many cloves would keep it sound and sweet."  Little House In The Big Woods, by Laura Ingalls Wilder

Little House In The Big Woods is my most favorite of the Little House books.  I love the descriptions given of daily pioneer life.  Clove apples are a very simple craft to make with children.  They don't have to make a pattern at all, but some will want to and they smell wonderful!  They also taste very good too (after cloves have been removed).  I found a small bottle of cloves for little more than a dollar at the local store, though they can be quite costly--I had to shop around.  The number of cloves per child can be limited if necessary.  Handi-wipes would be good to have on hand since the fruit is very juicy.

Press the sharp point of each clove into the apple.  Push it in until only the head of the clove shows.  you may need a toothpick to help you get started.  Continue until the whole apple is covered with cloves, (you can limit the amount of cloves if necessary).  To display your apple, place it on a dish or in a bowl out of direct sunlight.  You can also make clove oranges and clove lemons the same way you make clove apples.  These taste great in hot cider!  (instructions from My Little House Party Crafts Book, ISBN 0439060052)

Our family hosted a Library Story Time and we did this fun craft.  To see the lesson plan go to my Christmas Traditions, part 3 post.

Monday, July 25, 2011

Old-Timey Button String and Bracelet


I remember my mom having a button necklace.  I'll have to ask her if she still has one because I was always pretty fascinated by it.  Laura and Mary in By The Banks of Plum Creek make a button string for their little sister, Carrie.  Buttons were precious back then and were saved from one's childhood and even a mother's childhood as well.  Some buttons came from shops or peddlers, some were carved by hand, some were made of glass, wood, bone, shell, silver, and brass.  (During the Civil War in Gone With The Wind, by Margaret Mitchell, buttons were made by covering acorns with fabric!)  Old-fashioned buttons came in shapes of blackberries and a dog's head, or had tiny raised castles and bridges and trees on them.  I found instructions for making a button bracelet that was very similar to my mom's necklace.  My mom also had tons of buttons.  She eventually gave them to me and being an A-Type Personality, I made it my mission in life to find a use for each and every one of them.  I don't even remember what I used them for!  It would have been nice to make a button string of the more unusual ones as a memento.

This is an appropriate activity for five yr. olds and up.  As with all small objects, keep buttons and button strings away from small children.
I was given a trunk of beautiful mementos left by a neighbor of my mother's who really had no one left to leave it to.  In the trunk was an old-fashioned wicker sewing box and in that was a small collection of buttons (pictured).
Take your collection of buttons and using heavy thread (like quilting thread), 10 inches to 12 inches long--or longer if you wish, and double knot a small button to one end of the thread to keep the other buttons from sliding off.  Slide buttons onto the thread which can be stiffened with a few drops of glue (Laura and Mary would have used melted candle wax), or an embroidery needle can be used.  When satisfied with the button string, make a double knot after the last button on the string with the end of the thread.  Clip the loose end of the thread.  ("Baby Carrie's Button String," My Little House Crafts Book ISBN 0439059585)

For a button bracelet, thread needle with about 40 inches of thread and knot ends together.  Insert the needle from the back to the front of a white pearl shirt button, leaving a short tail of thread on the back.  Then insert the needle from front to back through the hole opposite the first hole as shown in Fig. 1. Knot the thread on back of button to secure.
Insert needle through first hole of same button again, add a gold bead and insert needle through second hole as before.
Insert needle from back to front of brown shirt button (or whatever colors you prefer--just have to be shirt buttons).  Add a gold 3mm x 6mm gold oval bead and insert needle through second hole of brown button as shown in Fig. 1.  (You can skip the gold beads if preferred.  My mom's necklace was made with only white pearl buttons).  Slide second button up tight to back of first button as shown in Fig. 2.
Continue to add buttons and beads in this way, alternating white and brown buttons so all white buttons are on one side and all brown buttons are on the other side and the right side of each button is topped with a gold bead.  Keep thread taut and buttons close together as you work.  When bracelet is large enough to fit over your hand, join the ends together and fasten off thread.  (I think this came from Reminisce magazine).  

Sunday, July 24, 2011

Star Spangled Shelf Paper

We used the "Star Spangled Shelf Paper" to edge the table.
I was always impressed with Laura Ingalls Wilder's mama.  No matter how many places that husband of hers drug her out to, she would try to dress it up a little--even a sod house which was normally considered very temporary housing.  In one book, Laura describes her mom making her own shelf edging to make the shelves a little more attractive.  I thought this would make a nice decoration for our dessert table at our Achievement Days Country Fair.  Here's how to do it:
I used packaging paper and taped pieces of paper together as I needed to.  Then you fold the strip of paper into 1/2-inch accordion pleats.  Cut out half a star.  A star cookie cutter or printing off a star from the computer and using it as a pattern by folding it in half would work.  I also gave the according fold a scalloped look so it looked lacy.  Carefully unfold the paper and smooth it out.  Fold the edge with the stars down so that the stars hang down over the edge of the shelf.  Secure the paper on the shelf with pieces of tape if you want to.

Saturday, July 23, 2011

Pioneer Rag Dolls

Christen and Elise's Rag Dolls
"But Laura was the happiest of all.  Laura had a rag doll.  She was a beautiful doll.  She had a face of white cloth with black button eyes.  A black pencil had made her eyebrows, and her cheeks and her mouth were red with the ink made from pokeberries.  Her hair was black yarn that had been knit and raveled, so that it was curly.  She had little red flannel stockings and little black cloth gaiters for shoes, and her dress was pretty pink and blue calico."

When we were studying about pioneers in our homeschool, we checked out so many books from the various local libraries.  I found one book (unfortunately I didn't keep the source), that had crafts for kids.  I remember the cover of the book had the cutest plates made from woven bread dough clay colorfully painted with flowers also made from the bread dough clay.  Inside were the instructions to make these dolls.  The girls were able to make the bowls and they did a great job, but I had to help them make the dolls.

I was in the process of taking pictures of their dolls for this post when Elise fondly reminisced how I had let the girls design their own dolls.  They chose the hair color and eye color.  Christen added a shawl from the scrap bag and fastened it with a pin from her Grandma Rosie.  I designed the little dresses myself keeping them very simple with tiny pin tucks at the neck.

My 15 yr. old son saw these dolls yesterday and rudely proclaimed them ugly :(  I said they were of a "primitive design" and were supposed to look like this!  In fact I followed the picture in the book freehand exactly as shown.  I've always thought they were very sweet and similar to Laura's doll, Charlotte, as described in Little House in the Big Woods, Chapter 4.  (I just remembered that my mom made a bunch of these simple rag dolls for a Relief Society fund raiser when I was a little girl)!

Basically, draw a doll figure on packaging paper or freezer paper, then cut out fabric.  (The pattern includes the head and the body, separately).  You stuff the head through the neck opening of the head, and the body through the neck opening of the body.  Once stuffed, sew head and neck together with a whip stitch.  (I used a 1/2 inch seam).  A knitting needle helped to push the stuffing into the arms and legs, etc. (Becoming Martha has a great rag doll tutorial that would work just as well probably!)

I used yarn in the desired color looping it around about a foot-wide piece of cardboard until it was enough to make a wig.  I carefully slipped the yarn off of the cardboard and used the sewing machine to make a seam down the middle of the yarn.  Fabric glue is applied to the head to keep the hair onto the doll's head. I used fabric paints to carefully paint a face (lightly sketch it out in pencil first).

I made the dress slightly bigger than the doll's pattern and sewed it together basically the same as the doll's but leaving the bottom of the dress and sleeves open and hemming neck, arms, and sleeves.  Even for a novice sewer like me, it was fairly quick and easy and the girls and I were happy with the results since they looked very much like the picture in the book.

Friday, July 22, 2011

Cornhusk Dolls

Landmark Park, Dothan, AL  2002
Members of our Junior Troop included my 9 yr. old daughter, Elise and 11 yr. old daughter Christen and a homeschool friend of Christen's.  Sidekick Bryce is working on his own cornhusk doll while the three girls demonstrate to other visitors of Landmark Park at a special event (probably Heritage or Harvest Days).  Between our homeschool group and Girl Scouts, we visited Landmark Park a lot!--usually free since we were doing some sort of service while there.  The following instructions Cornhusk Dolls can be found at Pioneer Days, by David C. King (ISBN 0439259398).

Cornhusks have a smooth side and a rough side.  Always keep the smooth side facing out.

  1. If the cornhusks are green, dry them until they are straw-colored.  Place between sheets of newspaper.  Store in a warm, dry place for 5 or 6 days, or until color turns.  (Can be found in produce section of grocery store or in craft stores).
  2. Cover work area with more newspapers (we used a plastic table cloth).  Soak dried husks in water for about 5 minutes before working with them.  This will make them softer and easier to shape.
  3. Remove all the husks from the water and shake the water out of them.  Cover the ones you are not working with, with a damp towel.
  4. Cut off the pointed tips of all the husks with craft scissors to make the shapes more alike.
  5. Form the doll's head by taking a large piece of husk and folding it in half.  Stuff 3 or 4 cotton balls under the fold.  Tie a piece of heavy thread (candle wicking is good) around the husk 1 to 2 inches from the fold to create a head shape (we actually used thin pieces of cornhusks to do this).  The ends of the husks will extend several inches below the neck.
  6. For the arms, cut a thin piece of husk about 7 inches long and wrap it around the 6-inch piece of wire or pipe cleaner.  Fold back the tips of the husk at each end of the wire.  Tie them with the thread at the wrists to form hands.  (You can omit the pipe cleaner/wire--they can be made without this).
  7. Slide the husk-covered wire between the two halves of the husk below the figure's head to form the arms, one on each side of the body.  Carefully bend the arms into any position you wish.
  8. Tie a piece of thread around the doll's waist.  Stuff 2 or 3 cotton balls between the husks to fill out the torso.
  9. For a full skirt, place 3 or 4 husks around the doll's waist, but point the husks up, so that they extend above the figure's head.  Tie the husks around the waist with thread, then fold them down over the tied thread to created the skin.
  10. If you would like, glue a little corn silk to the head for hair and use felt-tip pens to add facial features--eyes, eyebrows, nose, and mouth.  (I prefer not to do step 10 and leave them more natural).


making the skirt

how I like to leave the dolls

Here is the simplest version for making Cornhusk Dolls found in the Nov/Dec '98 CopyCat Magazine, p. 11.  See my post for homeschoolers or teachers of K-3rd graders: http://homemakersjournal.wordpress.com/2011/07/08/native-american-culture-activities-for-kids/indian0018/

Thursday, July 21, 2011

Yarn Dolls


The first time I ever saw a yarn doll was when I was in the first grade and my mom and sister and I went to a friend of my mom's for a Christmas get-together.  She had made these little dolls as Christmas tree ornaments in Christmas colors and crocheted little matching skirts for them.  She gave my sister and I a little doll and these adorned our tree for many years.  My mom probably still has these ornaments.

Directions:
Light-weight yarn, any color
4 x 4 inch piece of cardboard
Scissors 
Wind the yarn around the cardboard 12 to 20 times, depending on how thick you want your tassel to be.
Cut the yarn, and slip the end under the loops on the card.
Cut at 12 inch piece of yarn, and slip it between the loops and the card.  Tie the yarn in a tight knot to pull and hold the loops together.
Slide the loops off the card.
Tightly wind another 12 inch piece of yarn several times around the tassel, about one third of the way down from the top where your first piece of yarn is tied.  Tie in a firm knot.  This is the yarn doll's head.
Cut the loops of yarn at the bottom of the bundle, and trim the ends evenly.
Shake the yarn to fluff it.
Separate a few strands from each side of the doll to make arms by tying each arm with yarn about half-way down (wrap yarn around several times).  Trim each arm below where they are tied off.

Wednesday, July 20, 2011

Pioneer Handkerchief Dolls


"These are the perfect beginner sewing project for Brownie troops or for young 4-H'ers."

In the mid-1980's, when I was a young adult, I liked to go to local arts and crafts festivals.  The best one I ever went to was the Watermelon Jubilee in Ft. Deposit (Greenville), Alabama.  I bought an ink drawing by a local artist that I eventually framed, and a Handkerchief Doll.  I thought it was the most darling thing I ever saw.  I really didn't notice much about its construction until I read an article in the July 1992 Friend magazine by Judie Fordham.  She actually gave step-by-step instructions on how to make one.  This is something I wanted to share with my daughters as part of the many pioneer things I love.

Materials:
Man's large white handkerchief
1-1/4 yards, 1 inch wide colored lace or eyelet
a ruler
a  needle and thread the same color as the eyelet or lace
scissors
embroidery needle
pink and blue embroidery thread
stuffing
4 pieces of narrow ribbon 10 inches long
Sew a row of lace along one edge of the handkerchief.  Sew a second row slightly above the first.


On the opposite edge of the handkerchief, find the midpoint, then measure in 3-1/2 inches.


Embroider a pink French knot for the doll's nose.  Make two blue French-knot eyes 1/2 inch above the nose and about 1 inch apart.
Wad up enough stuffing to make a ball 2 inches in diameter.  To make the doll's head place the ball of stuffing under the face you just made, gather the handkerchief tightly around it, and tie it off at the bottom with a piece of double thread.  Tie a piece of ribbon into a bow over the double thread to make the neck.


Sew two circles of lace around the back of the head for a bonnet.  Make arms by rolling the handkerchief at each side of the head and tying in a knot, leaving 1: at each end for hands.


Make three bows out of the ribbon and sew them, equal distances apart, above the lace on the skirt.
The instructions for Handkerchief Dolls is found at the following link:
http://lds.org/friend/1992/07/handkerchief-doll?lang=eng&query=handkerchief+doll

Judie Fordham, "Pioneer Dolls," Friend, July 1992
When pioneer children were crossing the plains,
They didn't have cars, airplanes, or trains.
They walked beside wagons loaded clear to the top
With food, bedding, and seeds for the next season's crop.
There just wasn't room for a toy or a doll--
The wagons were filled with all they could haul.
So Papa's handkerchief became a new toy,
A cherished soft doll that brought lots of joy.
This cute little doll loves to play or just sleep.
She'll brush away tears if ever you weep.
So keep her close by--she's easy to hold--
And pretend you're a pioneer child of old.

HERE is an 8x10 printable of the Pioneer Dolls poem.


These instructions come from Kathy Ballard, "Pioneer Dolls 'Sew' Delightful for Small Stitchers," Country Woman, Jan/Feb 1992

Materials Needed (for one large and one small doll):
1/3 yard of white cotton fabric
Scraps of calico for skirts and scarves
Scraps of lace and ribbons for trims
Thread to match fabric
Knit-Cro-Sheen crochet thread or string
Small amount of polyester stuffing for head
Standard sewing supplies
Body:  Cut one 8 inch square of white fabric for small doll and one 12 inch square for large doll.  To form hands, tie two pieces of string or crochet thread on two adjacent corners about 1/2 inch from ends (see Fig. 1).

Head:  Place a ball of stuffing, the size of a Ping-Pong ball for small doll and the size of an egg for large doll, on fabric square, about a quarter of the way down from the top edge and centered between the hands.
Fold top of fabric over so it covers the stuffing completely; gather together under the head and tie with a piece of string (see Fig.2).  Pull arms out to each side and arrange, then bunch the rest of the fabric together under the arms and tie with another string (Fig. 2).
Skirt:  Cut out a 3 inch x 8 inch piece of calico for small doll and a 6 inch x 12 inch piece for large doll.  Hand-sew a gathering thread along one long edge of the skirt.
Pull up gathering thread and place skirt around doll beneath the arms, where the second string is.  Stitch top corners of skirt together in the back, securing the skirt to the doll at the same time.
Using two or three small stitches, hand-sew the bottom corners of the skirt together.  Trim away any of the white fabric that shows below the skirt.
Hat:  Cut a piece of lace that's long enough to fit over the top of the head, and sew it on for a hat brim.  Or make a scarf by cutting a 6 inch square for larger doll.  Fold fabric in half to form a triangle.  Place over doll's head and sew the ends of the scarf together under the chin.  Stitch to doll to hold in place.
Angel Wings:  For small doll, use a 2 inch wide of flat lace about 18 inches long for a piece of white fabric 2 inches x 18 inches.  Tie into a bow with 2 inch to 3 inch streamers and tack to back of doll just below the head.
Trims:  If desired, you can use lace to trim around the bottom of the skirt and tie scraps of ribbon around the neck waist or hands of doll.

Tuesday, July 19, 2011

Pioneer Chick Lit


Here are my favorite pioneer books:

Little House Series, by Laura Ingalls Wilder ISBN 0590488146
My Little House Crafts Book, ISBN 0439059585
Kirsten, An American Girl: 1854, ISBN 0937295760
Sarah, Plain and Tall, by Patricia MacLachlan ISBN 0618062416
Pioneer Days, by David C. King ISBN 0439259398

This one isn't exactly about pioneers, but describes in an entertaining way what life at the turn-of-the-century was like and has become a favorite of mine.  I especially like the recipes at the end of the book.
Memory of a Large Christmas, Lillian Smith ISBN 0393000389

Sunday, July 17, 2011

Flip Over Old Fashioned Games


The instructions for two games we played in my Children's Pioneer Day Event post are given below.  I also included more old-fashioned games and their instructions.  Of course these are games the neighborhood friends and I played as kids and I am not that old--so they have really stood the test of time.  I remember teaching them to my children and anyone else's kids that just happened to be around.

Duck, Duck, Goose Everyone sits in a big circle, with one person standing on the outside of the circle.  That person (the standing person) on the outside walks around the circle touching each person on the head, saying "Duck, duck, duck, etc."
When they decide to, the standing person touches someone's head and says "GOOSE!"  Then the person who has been "goosed" (the sitting person) jumps up and chases the other person around the circle before they get back to the "goosed" position and sits down in the circle.
If the sitting person catches the standing person, the standing person has to go again.  But if the standing person reaches the empty spot in the circle, the sitting person becomes the standing person.
This goes until everyone is tired of playing.

Button-Button, Who's Got the Button? Everyone sits in a circle, with one person standing.  That person puts a button between his/her hands (like they were praying) and you are basically trying to pass the button from the

Saturday, July 16, 2011

Children's Pioneer Day Event

Because I didn't Journal!!!  I don't remember why we did this activity indoors.  
I am not exactly sure where I got this wonderful idea.  On my Button Exchange Page, there are a few Mormon sites that this could have come from.  If there's time, it would be nice to use Activity Days (or Cub Scouts and Achievement Day Girls--whatever they call it now--the 8-11 yr-olds) for making invitations, homemade butter, posters for each camp, and learn the games ahead of time.  Then the older children can lead the younger ones in the games that are played at the Fort Laramie Camp.  We had a small group of children in our branch so I mostly used the help of parents.  I typed this program and left a space for names of folks who were helping (I asked ahead of time). It was no problem getting the children to dress up "old timey."  Putting a bonnet on a sister instantly turned her into a "pioneer woman."  A bandanna around the neck did the same for a brother helping with our program.  I always put down the time frame for each part of the activity to keep things moving so we don't go over time by much.  I included my materials list.  I like to keep a list hand so that I don't forget anything.  Butter recipes are included in an upcoming post:  Pioneer Children Recipes.

Nauvoo 10:00-10:05 am
The children are gathered together to begin.
"Brigham Young" (__________) tells about Joseph Smith and the mobs then a 'Missouian' comes and tells the Saints (the children) to leave.
"Brigham blesses (opening prayer) the "Locust Fork Company" and we begin our trek.

Sugar Creek Camp 10:05-10:15 am
The children gather round a "campfire."
They are offered a piece of Brigham Young's favorite candy -- horehound candy.
A pioneer sister (__________) tells about traveling on the plains:  "We traveled all day on the plains and if we could not get water, we traveled all night.  When we would camp, we gathered buffalo chips and wood where we could, and built our fire and cooked a little bacon.  Then the boys would get their fiddles and we would clear off the brush and dance and sing songs.  Then we would sing hymns and have prayers and go to bed.  We had to make our beds right on the ground, and if in the morning when we woke up there was a snake in bed with us, we'd just kick it out."

Winter Quarters Camp 10:15-10:25 am
Another pioneer sister (__________) offers the children a taste of horseradish.  They learn that it was used to cure scurvy, a sickness from not getting enough vitamin C.
The children taste homemade butter and bread.
She tells about pioneer cooking:
"Bread was mixed in a home-made wooden bread tray in the morning and placed in the wagon to rise during the day as they traveled along.  When camp was reached in the evening, it was baked in one of the rock ovens built by the previous pioneers.  Cows made the entire journey and furnished milk and butter for the family with some to spare for others.  The milk and cream not used immediately were put in a tightly covered wooden churn and fastened firmly inside the wagon; the butter was already churned when they reached the evening camp."

Chimney Rock Camp 10:25-10:40 am
The wagon master (__________) tells about pioneers eating dried prickly pear cactus and gives a taste of dried apples.
He tells about the Goodridge family:
"In Captain Hardy's camp there was a family by the name of Goodridge, father, mother, several young girls and an 11-year-old boy.  They were a musical family, full of fun and made the best of most every situation.  The girls sang and danced; they gathered berries on the way; they laughed.  But they also counted the graves and wondered about the sadness and hardships of the travelers and wept for those who had died along the way.  They helped nurse the sick, washed and mended, cooked and carried water; they knew how to work.  When necessary, they would wade streams without complaining, shake the dust out of their clothing without resentment and gather buffalo chips without disgust.  They could fall on their knees night and morning and thank their Heavenly Father for their health and strength, their safety, their food and clothing, and the boundless sea of grass that paved their way to freedom..."
Brigham Young tells the "pioneers" they are too discouraged and cannot leave until they sing a song to lift their spirits.  So as they leave (walk around the property) towards the  next camp, they sing pioneer songs (i.e. Pioneer Children Sang as They Walked, The Handcart Song, and Come, Come Ye Saints).

Fort Laramie Camp 10:40-11:10 am
The school-teacher (__________) tells about the work the children did:  "boys helped the family to find food, and sometimes using the slingshot or a gun, brought home a rabbit or squirrel for dinner.  They would tend the animals and drive the wagons or pull the handcarts.  Girls helped gather wood and buffalo chips for the fire, they would help make food and tend to the younger children.  The pioneers walked 1,297 miles!  Sometimes they carried a brother or sister because they were too tired to walk and there was no room in the handcart."  (Have a child try to carry a sibling about 20 feet).  But pioneer children also found time to play some old-fashioned games."
(Lead the children in games such as, Button-Button, Duck, Duck Goose, Spin-the-Bottle, Mother, May I?  and Pioneer Laundry Race.  These games and more are found in the next post Pioneer Games.)
The children taste jerky and drink lemonade.

Salt Lake Valley Camp 11:10-11:25 am
A pioneer sister (__________) tells about the seagulls and the crickets:  "It was June and the Saints were struggling to plant crops in the Salt Lake Valley...they planted rows and rows of corn and vegetables.  The crickets covered all the crops and were eating everything green.  First they tried to drown crickets with water, but it didn't work.  So then they got sticks and clubs and tried to kill the crickets.  As soon as the sun came out the next day, the crickets came out again in more numbers than before.  When almost all hope was lost the seagulls came from out of the sky, swooped up the crickets and took them away."
The children plant crops (seeds in egg cartons--cut each opening so that it makes a little bio-degradable container that can be planted directly into the ground).
"Brigham Young" arrives and declares this is the right place, blesses the "crops" and offers a closing prayer.
As the children leave, we give them an old-fashioned peanut butter cookie.

Materials List:
Invitations
Homemade butter
6 camp posters
Horehound candy
Wheat bread
Peanut butter cookies (I used Archway Molasses Cookies)
Button
Bottle
Egg cartons (biodegradable)
Potting soil
Bean seeds
Plastic spoons (to fill cartons with soil)
Horseradish
Dried apples
Jerky
Lemonade
4 buckets
Two boards
Campfire wood
Photographer __________

LinkWithin

Related Posts Plugin for WordPress, Blogger...