Showing posts with label preparedness. Show all posts

Saturday, March 26, 2016

Real Food Storage Resources (not MREs)

The history of the world is the record of man in quest of his daily bread and butter. ~Hendrik Van Loon
Food storage can be a real relief even if it's as simple as a few home-cooked casseroles stocked in the freezer for those "bad days," or a cabinet full of cans of chicken noodle soup when you have a cold.  Becoming prepared can seem like an overwhelming task, but it can be as simple as buying two cans of diced tomatoes and putting one in storage and the other in the kitchen.  Continue this with the rest of the grocery list.

Strive to have 72 hours worth of ready to eat food.  Then make it a week's worth and eventually 4 week's worth.  Next multiply that by 12 and I'll bet you will have a year's supply of food.  Do the same with paper products, hygiene, first aid, etc.

Of course storing a year's supply depends on whether you have the room.  Maybe you only have space for 72 hours or a week--it's okay to do what you can.  There is peace in knowing you can "shop" your pantry and not have to run to the store for every little thing!

Here are some sites I return to again and again for food storage knowledge and inspiration:
The Family Homestead is a site I enjoy exploring for inspiration.
http://thefamilyhomestead.com/
LDS Church Provident Living site runs the whole gammut of preparedness training.  I personally have used this site to buy a year's worth of food storage.
Provident Living is a source for food storage purchases.  They teach about preparedness and gardening and much, much more.
Food Storage Made Easy is your food storage 101 class for newbies.
Preparedness Skills
Random Sampler of Great Ideas!  (Ensign, June 1974) Has a ton of useful information beginning with how to dehydrate all kinds of food from the garden and even meat!  It explains how to smoke and can fresh caught fish.  I get a thick sales paper each week in my mailbox that must be put to some use or thrown away.  An idea is given to turn newsprint into bundles that can be stacked and used like wood.  (Or make these cute pioneer haysticks with newspaper that I found at Martha Stewart).  Whether a camping enthusiast or survivalist wannabe, learning how to cook using a tin can is a useful skill.  Instructions are given for recipes, a buddy burner, stove and oven.
Food Storage Rotation
For the real enthusiast, the question is how to keep up with the food storage and rotate it out so that nothing spoils and is wasted.  "Tracking Our Food Storage," by Leslie O. Anderson (Ensign, Feb 1996) uses a system much like the old library cards where each section of food storage has a card or slips of paper that you pull when you take something from that shelf.  Then you put the slips with the grocery list and replace the items.

Sunday, October 13, 2013

Pinterest Recipes I've Tried (and my adaptations)

For the past couple of weeks, I have been using recipes I found through Pinterest to make meal preparation a little more interesting.  All of these recipes have been quite a success, though I did make a few modifications now and then.  (One time I forgot to turn on the crockpot.  All that was in the pot was potatoes and spices, so I made the meal on the stove instead to make up for lost time.  That was the Slow Low Country Boil).  I did not take pictures of each of these meals because it had not occurred to me to write about this experience.  But I saw that one person had a Pinterest board for pins she had tried.  I want to do that too!  I would like to share my thoughts on the following pins (and to remind myself of any adaptations I would make).  

Here is my Pinterest Board:


Visit Heather's profile on Pinterest.

Skillet Rosemary Chicken 2-24-14
Words cannot describe how delicious and how easy this recipe was!  I used dried rosemary because that is all I had, and I just put all the herbs, spices, olive oil and lemon juice in a blender and pulsed it real good.  I even forgot to place the chicken in the lemon mixture before browning the skin in the skillet, so I basted the chicken really good after I placed it on my mushrooms and potatoes.  I wanted to use up some Idaho potatoes and they worked fine.  I couldn't find anything at Walmart that said cremini mushrooms so I used the cute little white ones.  Those were the best tasting mushrooms I literally have ever had!  And the potatoes turned out very tasty as well.  I only cooked four thighs and all the ingredients fit perfectly in my skillet.  I keep my iron skillet well-seasoned so everything slid out like it was supposed to and I feel the skillet really added to the flavor.  I HIGHLY recommend this recipe.  I can't tell you how good it is to find a thigh or leg recipe that's out of this world like this one.  I collect these recipes because legs and thighs are more economical to buy than white meat.  You can find a great chicken leg recipe I made right HERE.


Freezer Breakfast Burritos

Here is a picture of the Breakfast Burritos.  They were sooooooooooooooooo good!  They were actually better after reheating them in the microwave than they were fresh.  The cheese just got so gooey good.  I can see this being a must have on any kind of trip, especially a camping trip.  If your family likes to eat breakfast, these breakfast burritos are a must-have in the freezer.  I really love collecting and preparing a month-full of dinners at one time and now I plan on doing the same with breakfast foods. 
I did about a half-recipe to try the recipe out for the first time and I recommend doing that because there is a lot going on at one time.  It might be good to have a helper like a child who likes to grate cheese and stir the hash browns or lightly warm the tortillas.  I chickened out at the last minute and did not put the spinach in with the eggs—but I will try it next time because I really love spinach. 


Taco Pizza

The Taco Pizza was amazing!  It turned out just like the picture (so I did not need to take a picture anyways).  The only thing I would do different is to remember to kind of toss the chopped tomatoes on a paper towel because it made the pizza a little wet in some places.  We did not have leftovers, but if you did, you would not want any sogginess on the pizza.


Outback Green Beans

I made the Outback Green Beans and they were very good.  This is a great recipe if you can get garden fresh green beans because store bought is just not the same.  I steamed my green beans and they would have been perfect if I had remembered to stir them in the steamer so they get the same amount of doneness all over.  Also, I would only make a half recipe of the sauce.  However, I imagine using the extra sauce on chicken for another meal would be delicious.


Forgotten Chicken

The Forgotten Chicken was very interesting.  The rice turned out beautifully.  However, I do not happen to like using Lipton Onion Soup Mix as a seasoning on top of the chicken as the recipe instructs.  It was too overpowering for me and I only used half a packet.  I believe using my own special seasoning blend would be even better because my blend brings out the best flavors in chicken and the two condensed cream soups have plenty of flavoring as well.  My own seasoning blend recipe can be found HERE but basically consists of salt, course pepper, celery salt, onion powder, and garlic powder.  I use it so much that it is kept combined in a shaker to use whenever I need.  This recipe will definitely be tried again with the minor change.  What a great way to use Minute Rice brown rice which is supposed to be healthier.  I also recommend this recipe as a comfort meal to take to someone.

 Skinny Slow Cooker Chicken

Skinny Slow Cooker, Chicken and Mushroom Gravy

The changes I made to Skinny Slow Cooker, Chicken and Mushroom Gravy was to use boneless thighs instead of skinless chicken breast filets.  I believe this change made the recipe even better than it already was, plus it was cheaper.  You could combine thighs and legs if you wanted to.  The herbs and spices with the oil (I used light virgin olive oil instead of canola) made the chicken so delicious.  When I make this again, I am not going to bother with the gravy.  The chicken makes its own wonderful broth and I felt adding canned broth and making a gravy was unnecessary.  I put the chicken and mushrooms on top of Minute Rice brown rice and the family gobbled it right down.


Slow Low Country Boil

The Slow Low Country Boil, (the one I forgot to turn the crockpot on for), was truly restaurant quality.  The cost was moderate and the meal was even better than a comparable one we had at Red Lobster a few weeks before!  I even found Red Lobster biscuit mix at Walmart and had my husband whip them up to go with the meal.  He never cooks and they turned out beautifully.  This is a fabulous meal.  We made it with frozen corn on the cob halves and just left them as halves, although they would have been prettier if I could have followed the recipe with shucked corn cut into four pieces.  Ya’ll definitely try this one because it would really impress guests!


Cheese Steak Sandwiches

One of my fav’s was the Cheese Steak Sandwiches.  Fall is a great time of year to figure this one out.  I am going to give a few more details because the pin does not have much.  I had never made cheese steaks before and was a little nervous.  The recipe calls for cheap steak and that is what I got!  Look at the pictures on the pin to get an idea what the steak should look like at the store.  Then slice it pretty thin, discarding the fat. 
I cooked it in its own juices with the onion and salt and pepper on medium heat until its own juices were almost gone and then I put the French onion soup in there and brought it to a boil, lowered the heat to medium-low, and put the lid on the pan.  Being Southern, I wanted to slow-cook the steak in the soup until the meat was very tender. 
I used two pieces of American cheese for each hoagie sandwich, doubling the cheese, and tearing in half so every part of the sandwich had cheese.  These sandwiches were going to be cheesy!  They were so good, I felt like such a glutton! 
My family said they were better than any restaurant sandwich they had ever had, and my daughter has actually been to Philly and had an authentic Philly Cheese Steak.  This is definitely a great meal for football fans.


Crock Pot Chicken Fajitas

Okay now for Crock Pot Chicken Fajitas.  I loved this recipe because it said you could use thighs.  I was skeptical and up to the challenge of trying fajitas made with thighs.  This recipe was out-of-this-world!  It made a lot and there was NOTHING left folks!  This is definitely the one to do for teenagers and guys—a really easy recipe for after church or Saturday college football in front of the tube.  

How have the recipes on Pinterest been working out for you?  I find most of them fairly reliable but I have also had my share of disappointments.  Let me know!


Friday, June 14, 2013

Perfect, Easy Biscuits

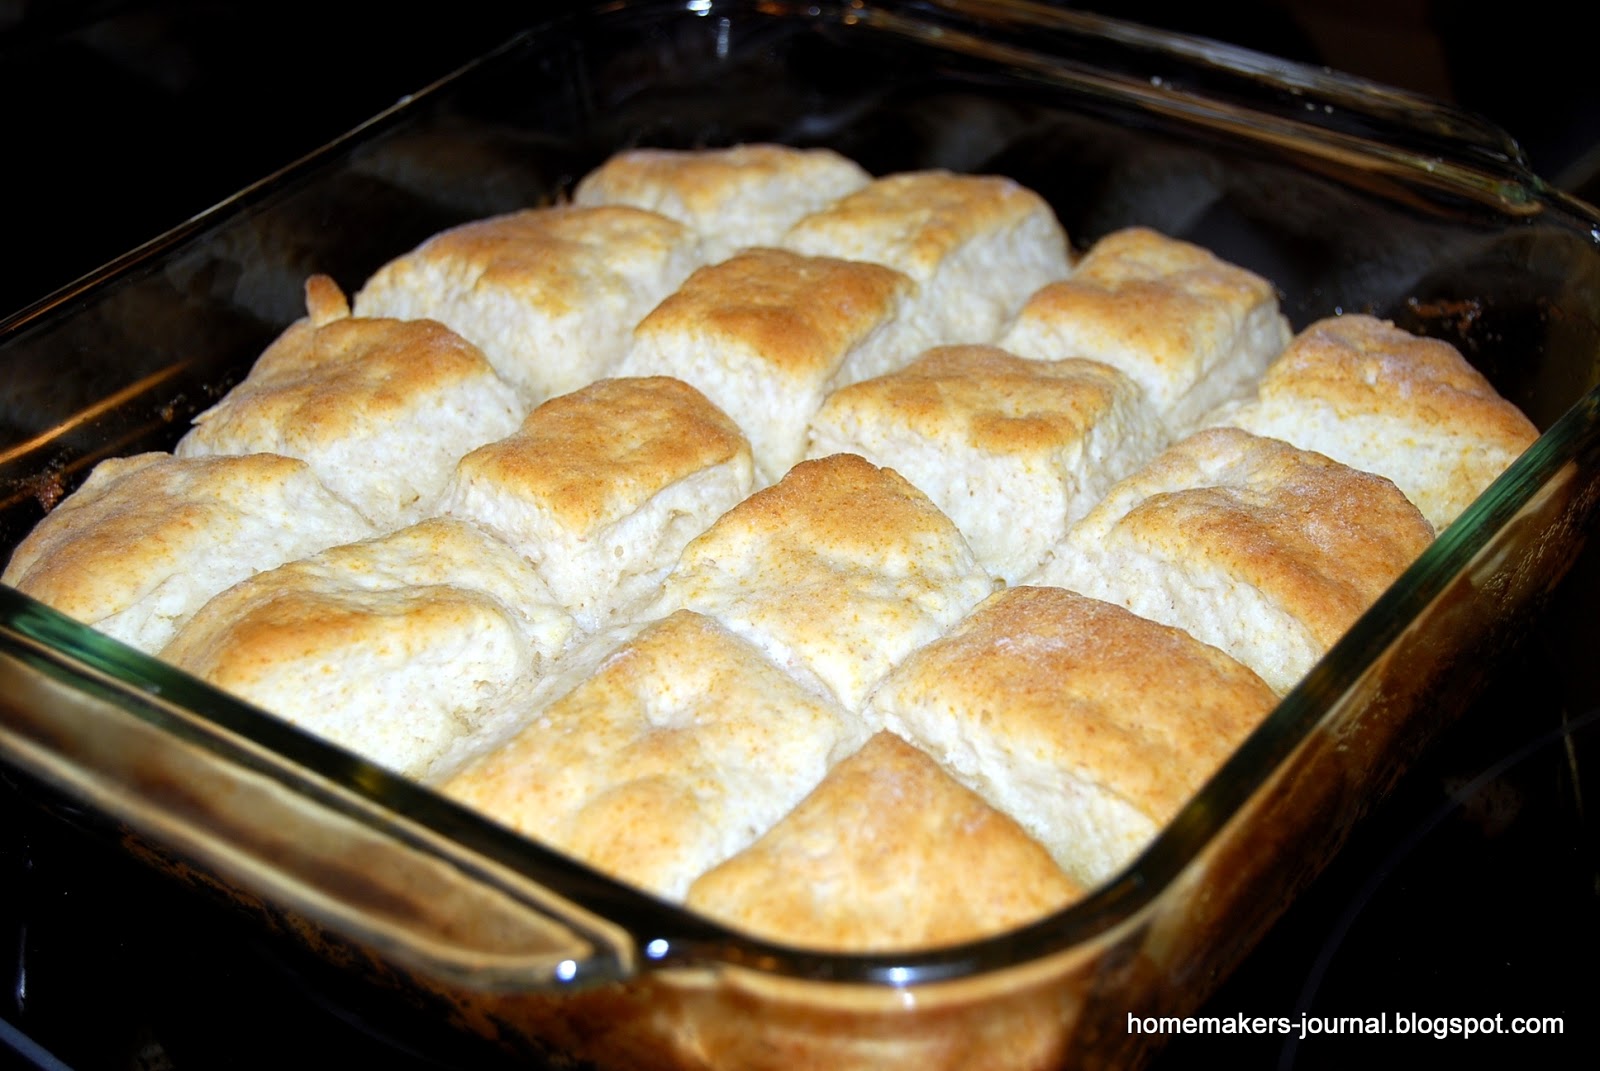
There are a few things that I think every homemaker should be able to do well, and one of those is make perfect biscuits.  I found a fabulous recipe for 7up Biscuits using Bisquick from www.plainchicken.com.  I was so excited to find this different and easy recipe using Bisquick since I make my own homemade version of a quick mix which uses wheat.


The recipe can be found and printed out at www.plainchicken.com.  I will describe the process adding some helpful hints for those who may be biscuit-making novices.

Step-by-Step Procedure

Heat the oven to 450 degrees F.

I go ahead and melt one-fourth cup of butter in my 9 x 9 inch pan in the oven.  Be sure to take the pan out when butter has melted so it won't brown.

Place two cups of Bisquick, or your own quick mix, into a large mixing bowl.  You can make a well in the center if you like and place a half-cup of sour cream (I like Daisy).

I actually work the sour cream gently into the Bisquick with my fingers until the sour cream has wetted most of the flour mixture thoroughly.

Then I pour 7 Up into a half measuring cup but more-than-likely, I will not use the entire half-cup.

Just sprinkle the 7 Up by Tablespoon over the top of the sour cream and Bisquick mixture.  Use a fork to fluff the 7 Up throughout the mix.

When most of the Bisquick has formed a ball in the center with just a little bit still hanging to the sides of the bowl, the dough is probably ready to gently knead together on a lightly floured counter.  The key is to use as little flour when kneading and only knead enough to be able to pat dough into a square.

Since I don't want to overwork my dough, I don't bother with the biscuit cutter.  I just pat the dough into a square slightly smaller than the measurements of my 9 x 9 inch pan (or 8 x 8), rather than use a rolling pin.

Use a sharp knife to cut into squares.  Then I place each square right onto the butter in the pan basically in the same exact way that I patted and cut it out on the counter.

Bake for 12-15 minutes, or until golden on top.  Cool in pan on a cooling rack (if they last that long!)  They are best served hot from the oven.

Baking Mix Recipes to Try

I like having the biscuits slightly connected so they are flaky and  moist.  This recipe is so good, the texture is almost like making yeast rolls.  This would be a great recipe for camp and cooked in a box oven!  My box oven instructions can be found at Homemaker's Journal, Easy Outdoor Cooking Recipes post.

For more delicious Quick Mix recipes see Homemaker's Journals beautiful and delicious Christmas Coffee Cake post and scrumptious Quick Mix Pancakes found at Some Favorite Campy Things, part 2.

I hope you enjoy this recipe as much as our family has.  I like to experiment with recipes using soda pop as an ingredient.  How do you use soda in your favorite recipes?

Monday, February 18, 2013

Foil Packet Dinners

Served with just regular old Wonder Bread or buttery Texas toast, this is my go-to meal.  My 17-year-old son LOVES this rendition of barbecued chicken and so does my pocket book!  I like to collect foil packet dinners for camping, but I end up making this meal all the time ‘cause it’s so easy and inexpensive.  Instead of individual packets, I throw the whole thing in a large pan and wrap tightly with foil.  You can increase or decrease the portions as you like or use chicken thighs as well as legs.  Heck, throw in a few wings. 


My favorite inexpensive sauce is Kraft’s Spicy Honey BBQ Sauce.  I also like to cook the meal a full hour ‘cause a lot of us Southerners believe in slow-cooking our barbecue.  (You can turn the oven down a little if you like).  Try this hearty, finger-lickin’ meal and see if you don’t join our fan club!  P.S.  I never defrost the corn on the cob and it turns out great every time!

Are you a fan of foil packets too?  What are your favorite ways of using aluminum foil when cooking?

Barbecued Chicken in Foil printable
8 chicken legs                                                    2 T. butter, melted
4 small ears frozen corn, thawed                      ½ c. barbecue sauce
1 t. salt                                                               1 (15-oz.) can pinto beans, rinsed and drained
½ t. pepper                                                     
Toppings: barbecue sauce, shredded Cheddar cheese, chopped green onions
This recipe can be done as follows (which is great for campouts!) or when I do this at home, I put everything in my largest pan and wrap the top tightly with foil.  This recipe also doubles very well!
Tear off 4 (18 x 12 inch) sheets of heavy duty aluminum foil; lightly grease 1 side of each.  Place 2 chicken legs and 1 ear of corn in center on lightly greased side of each foil sheet.  Sprinkle evenly with salt and pepper; drizzle corn evenly with butter.  Spoon barbecue sauce evenly over chicken; top evenly with beans.  Bring together 2 sides of each foil sheet over ingredients, and double fold with about 1-inch-wide folds.  Double fold each end to form a packet, leaving room for heat circulation inside packet.  Place packets on a baking sheet.  Bake at 450 degrees for 40 minutes.  Carefully open packets to prevent burns from hot steam.  Serve with desired toppings.

Monday, November 12, 2012

"En Bonne Ménagère..."

Photo from Homemaking for Teen-agers, Book 2, McDermott and Nicholas, 1958
Which means "Like A Good Housewife."  I read it in a book recently and just couldn't resist using it.  How often does one use that phrase anymore? For all you "Good Housewives," here is a recipe for "How to Preserve A Husband" from The Saturday Evening Post All American Cookbook (by Charlotte Turgeon and Frederic A. Birmingham).

How to Preserve A Husband

First, take care in selecting one who is not too young, but tender.  Make your selection carefully and let it be final.  Otherwise, they will not keep.

Like wine, they improve with age.  Do not pickle or keep them in hot water.  This makes them sour.

Prepare as follows:  Sweeten with smiles, according to variety.  The sour kind are improved with a pinch of salt of common sense.

Wrap well in a mantle of charity.  Preserve over a good fire of steady devotion.  Serve with peaches and cream.

The poorest varieties may be improved by this process and kept for many years in any climate.

Monday, October 1, 2012

Simple Oktoberfest Family Meal


This meal can be cooked over an open fire or right in the oven.  Be sure to use a pan to catch possible drippings if you cook in the oven.  A great way to enjoy a beautiful fall evening at home or camping.  Print Recipe

Simple Oktoberfest Family Meal
1 lg. sweet onion, sliced
3 lg. bell peppers:  green, red, and yellow
4 medium potatoes, sliced 1/2-inch thick
6 medium carrots, sliced 1/4-inch thick
1 small cabbage, sliced
2 medium tomatoes, chopped
1 to 1-1/2 lb. cooked Polish sausage
1/2 c. butter or margarine
1 t. salt
1/2 t. pepper
Place onion, peppers, potatoes, carrots, cabbage and tomatoes on three pieces of double-layered heavy-duty foil (about 18 x 18-inch).  Cut sausage into 1/2-inch pieces and add to foil; dot with butter.  Sprinkle with salt and pepper.  Fold foil around the mixture and seal tightly.  Grill, covered, over medium coals for 30 minutes.  Turn and grill 30 minutes longer or until vegetables are tender, (if you open bundles to check, be careful of steam escaping, and carefully fold back if more time is needed, so they don't leak).  Yield:  6 servings.

Monday, March 26, 2012

Honey Wheat Pizza Dough (rotation recipe)

This is one more way I'm able to rotate my food storage wheat.  I love this pizza dough--it's easy enough for a beginner and always turns out great!  You can use whatever oil and salt you have on hand, but I prefer the taste of olive oil and sea salt.  I like to let my yeast sit for about 3 minutes and make sure it's active.  (Keeping an opened jar of yeast safely in the fridge will keep it fresh).  It's so good, I barely got a shot of the pizza :0)


Honey Wheat Pizza Dough
1-1/2 teaspoons yeast
3/4 cup warm tap water (not scalding)
1-1/2 cup all-purpose flour
3/4 cup whole wheat flour
3 tablespoons honey
1-1/2 tablespoons olive oil
1-1/4 teaspoons sea salt
Dissolve yeast in warm water.  Add all-purpose flour, whole wheat flour, honey, olive oil, and salt; mix well. Knead for several minutes until dough is smooth and elastic.  Place dough in a greased bowl, turning to coat.  Cover and let rise in a warm, draft-free space for one to two hours or until double in bulk.  Punch dough down and roll to shape.  Yield:  dough for one 15-inch pizza.

Here's a good tip on Storing Wheat, from an old Ensign magazine:
We purchased four shelf boards, and by stacking the three-pound cans we made a wall bookshelf.  These we painted the same color as the wall.  The total cost was seven dollars.  We have a lot of fun when friends compliment us on our new bookshelf.  We tell them there is more there than meets the eye--food for the body as well as food for the spirit.  They are amazed when we tell them about the 420 pounds of wheat stored there.  ~Bernice Ketner  Below is a picture found on Pinterest (originally icanmakethat.com) which gives a similar idea:


Back of the loaf is the snowy flour, 
And back of the flour, the mill, 
And back of the mill is the wheat and the shower,
The sun and the Father's will.  ~Anonymous

My teenage son sticks his nose up at homemade pizza even though I think I do a pretty good job.  However, I'm looking for really great pizza recipes and have been collecting some on Pinterest.  Do you have a killer pizza recipe that you think my son would like?  Send me the recipe today!

Follow Heather Allen's board Cook: Pizza on Pinterest.

Monday, March 19, 2012

Use-It-Up Whole Wheat Bread (rotation recipe)

This is a great food storage rotation recipe :0)
This great-tasting bread helps me rotate my food storage wheat supply so the wheat (if stored properly) will maintain it's optimum nutrients.  This uses only wheat and yet the loaf is soft, easy to slice, and tastes delicious--like buttery honey.  You shouldn't need any dough enhancer with this recipe as long as your wheat is in good condition (not too old).  As shown, I like to make mini-loaves to share or to make a meal of soup or stew special.  Mellowed cheese and a mini-loaf of bread can turn even canned soup into a gourmet treat.

Use-It-Up Whole Wheat Bread
2 pkg. active dry yeast
1/4 c. warm water
2 c. warm water
1/4 c. honey
2 t. salt
3 T. oil
5-1/2 to 6 c. whole-wheat flour, divided
1 T. butter, melted
  1. In a small bowl, dissolve yeast in 1/4 cup of warm water, (hottest tap water, 105 to 110 degrees).  In a large bowl, combine 2 cups warm water, honey, salt and oil.  Stir in 2 cups of whole-wheat flour, mixing well.  Stir in yeast mixture.  Now the mixture should be the consistency of cake batter.  Add more flour, 1/2 cups at a time, to make a fairly stiff dough.  Don't put too much flour in because you can knead in more, if necessary.  
  2. Sprinkle a little flour on a board or clean counter or pastry cloth; knead dough 10 minutes.  
  3. Shape dough into a ball.  The dough should be fairly smooth.  
  4. Spray a large bowl with cooking spray; place dough in bowl and spray the top of the dough. Let rise 45 minutes or until double in bulk.  This can be done by placing plastic wrap loosely over bowl, and placing in an oven that was briefly heated at 175 degrees, (turn oven off before placing dough inside).  Place a small bowl of water in warmed oven to keep it humid.  After dough has risen, punch down, divide in half and knead a little; let rest 10 minutes.  
  5. Shape dough into 2 loaves and place in two 8" x 4" greased loaf pans.  (see below one way to form a loaf of bread).  
  6. Split top; drizzle with melted butter.  
  7. Cover each loaf with plastic wrap, and let rise in oven with bowl of water until double in bulk, about 30 minutes.  
  8. Bake at 350 degrees for 40 minutes for metal pans, and 325 degrees for glass bread pans (adjust time for smaller loaves).  Cook slightly longer for glass pans.  About half-way through, loaves may need to be vented with aluminum foil to prevent over-browning.  Bread should sound hollow when tapped on the top and bottom of the loaf.  Remove loaves from pans and cool on wire racks.  Yield:  2 loaves or 5 mini-loaves.

1.  Mixture is ready to knead.


2.  Knead with the palm of your hand.


3.  Place in a greased bowl.


4.  Spray dough with nonstick spray and cover with plastic (forgot to take the after photo!)


5.  After punching dough down and letting it rest for 10 minutes, split the dough into two or more loaves and form it into a loaf or roll it out as shown.


Then roll it up like a jelly-roll.


Pinch ends under.


Place loaf in a greased pan.


6.  Split the top with a sharp knife and drizzle with melted butter.


7.  With sprayed plastic on top, return to oven and let loaves rise double in size.


8.  Now the loaves are ready to go into a preheated oven.  I put the little loaves on one large cookie sheet so they are easier to take in and out of the oven.  Smaller loaves do not take as long to bake.

Monday, March 12, 2012

Wheat Quick Baking Mix (rotation recipe)

I use this baking mix recipe as a basis for so many other recipes.  It is just like Bisquick, only better!  Though it lasts for six weeks, I go through it pretty quick because I have so many great recipes.  It's one of the main ways I use up my wheat and POWDERED MILK purchased from the Cannery.  That is why I call it a rotation recipe because this recipe helps to use up my old food storage which I replenish on a regular basis.

"All grain is good for the food of man...Nevertheless, wheat for man."  Doctrine and Covenants 89:16-17

I grind several #10 cans of wheat at a time.  I store these in doubled freezer bags in the freezer.  I also keep a container of ground wheat in my fridge.  When this container is empty, I refill it with wheat from the freezer.  I try to make whole wheat bread and Bread-for-Beginners wheat rolls as well as my Honey Wheat Muffins on a regular basis.  I've tested a lot of recipes for whole wheat and choose only the best-tasting for my family so we'll eat lots of it.  This recipe helps to use up wheat and it also tastes great made with butter-flavored Crisco :0)

Wheat Quick Baking Mix
8 cups all-purpose flour
2 cups whole wheat flour
1/2 cup non-instant powdered milk
1/3 cup baking powder
1/4 cup sugar
1 tablespoon salt
2 cups Crisco shortening (or butter-flavored Crisco)
Combine dry ingredients; mix well.  Cut in shortening with pastry blender until mixture resembles coarse meal.  Store in an airtight container at room temperature.  (Mix may be stored up to 6 weeks).  Package for gift giving and present with the following recipes.  Yield:  15 cups.

Wheat Quick Biscuits
1 egg, beaten
1 cup water or milk
2 cups Wheat Quick Mix
Combine egg and water in a mixing bowl; mix well.  Add Wheat Quick Mix; stir just until moistened.  For each pancake, pour 1/4 cup batter onto a hot, lightly greased griddle.  Turn pancakes when tops are covered with bubbles and edges are brown.  Serve with syrup.  Yield:  Eight 4-inch pancakes.

See these fabulous Quick Mix Recipes!

Wheat Quick Christmas Coffee Cake
Wheat Quick Sausage Balls 
Wheat Quick Pancakes
Perfect, Easy Biscuits (7 Up Biscuits)

How I store my Wheat Baking Mix in the fridge.

Do you have a favorite baking mix recipe to share?  I am always looking for more to try out and include in my collection.


Tuesday, January 31, 2012

Young Women's Camp

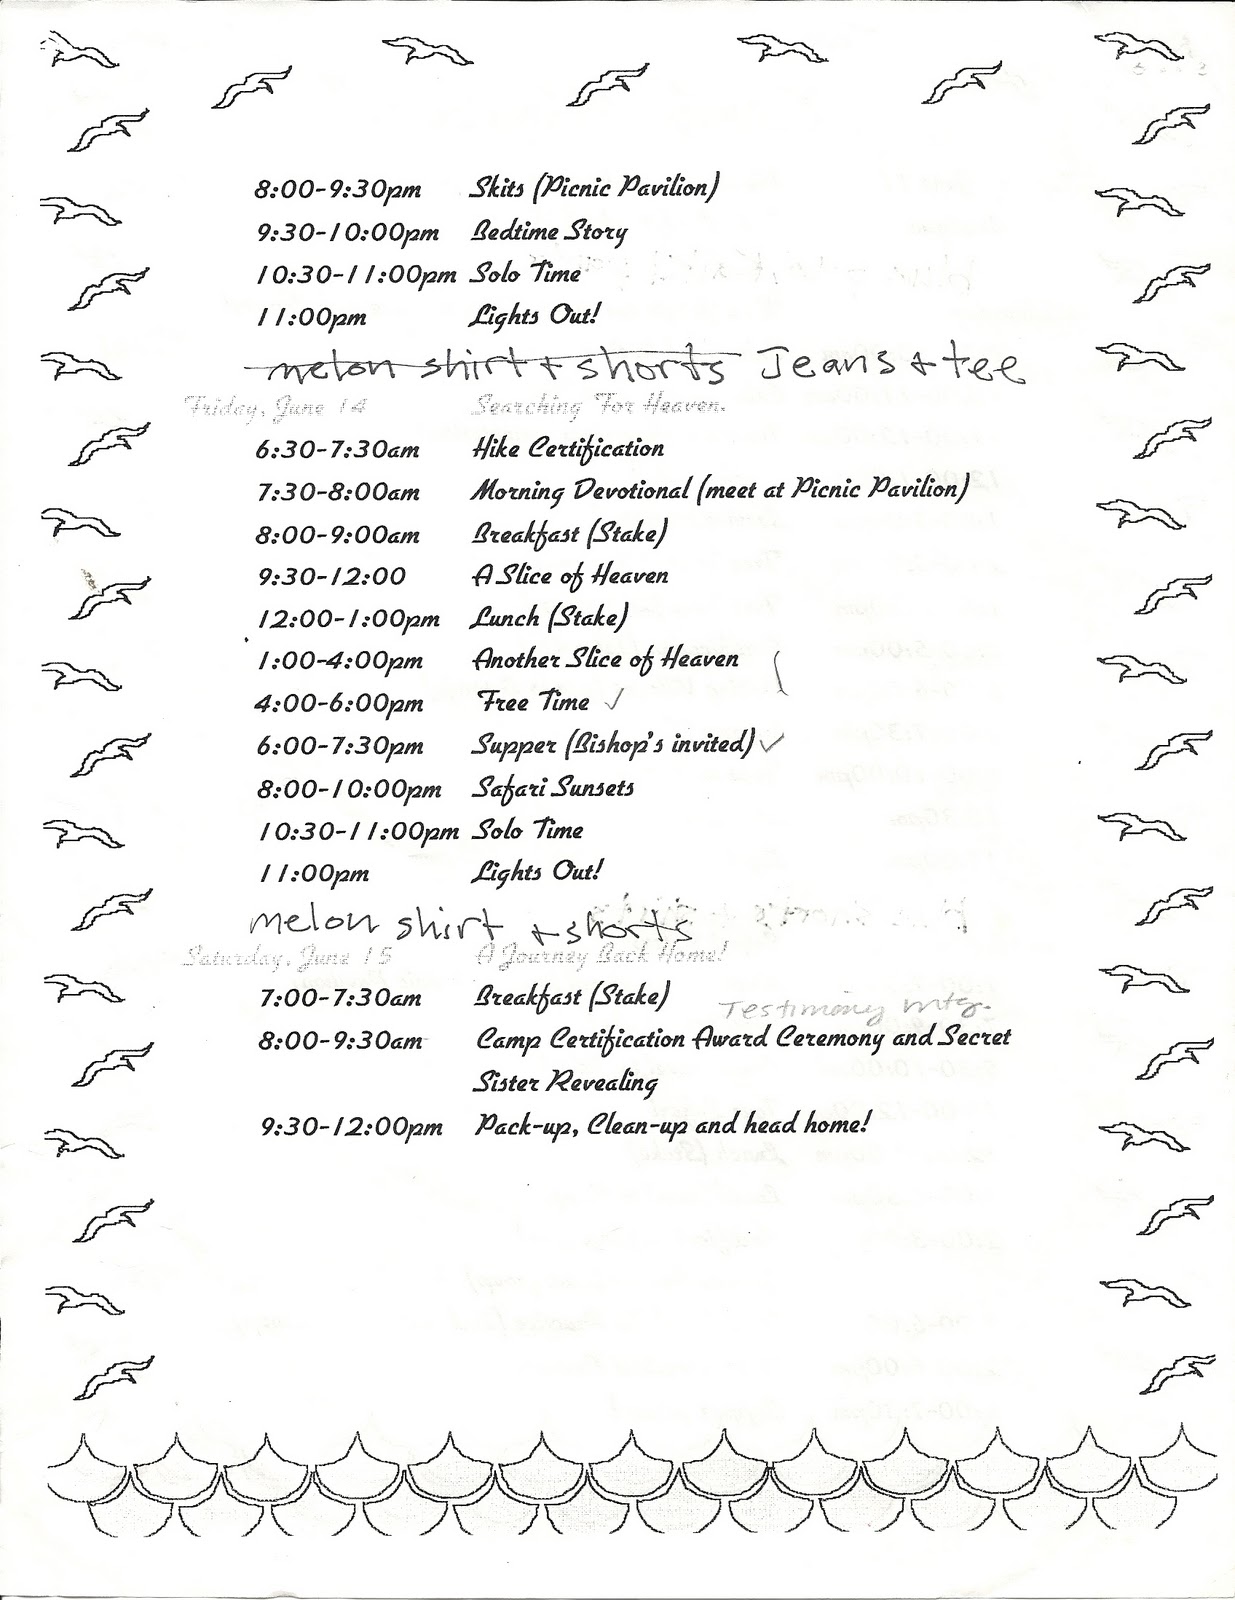
We used to donate a homemade quilt at Girls' Camp each year in our current stake.  It was the best service project!  Below is the first Girls Camp Schedule that my oldest daughter attended.  It was a S.A.F.A.R.I. theme (Stand As Faithful And Righteous Individuals) and was held at a state park in Georgia near an actual safari park with exotic animals.  I always loved going to state parks and girl scout camps for Girls Camp.  It was fun to see other locations to camp at.  This camp was well-organized combining the traditional with a new twist.  It's a nice memento and might be useful to others.  
Here's some camp songs.

I recorded these fun YW Camp crafts here in case the link ends up missing from http://www.christysclipart.com  Even though my own girls never did these particular crafts at Girls Camp, we still got to do them at home.  I've been a fan of Christy's sight for maybe ten years! 

YW Value Matches:  Using crayon wax, dip "strike anywhere" matches in the colors of the Young Women Values and put in ziploc snack baggies with this poem attached:  "In my hands I hold a match whose flame is small to see.  And if I give but one light to you, my life is filled for me.  But...In your hand you hold a torch for many eyes to see.  So hold it high that they may light their candlewicks from thee." 

YW Theme Shelf Sitter - Value Experience 6 (Christy's Y.W. Pages) 
Purchase a 4" x 4" post.  Have the folks at the hardware or lumber store cut it into 4" lengths.  Sand the sides and corners of each cube.
On the night of the activity, have the girls paint their blocks one of their favorite colors, using acrylic craft paints (they dry faster).  You can dilute the paints and do a dry brush "wash" effect, or a pickling effect by putting the paint on then rubbing parts off.
As the blocks dry, have a short lesson on the YW theme, and what different parts mean.
When the base coat is dry, the fun begins.  You can have stencils, patterns, images (to decoupage) and sandpaper ready.  Have the girls paint the words to portions of the theme on each side of the block.
1. Sacred Covenants
2. Stand as a Witness
3. Strengthen Home and Family
4. Receive Ordinances of the Temple
5. Blessings of Exhalation
6. We are Daughters of Our Heavenly Father
When the painting is done, use the sandpaper to rough the edges, and age the blocks.  You can also add a light coat of stain to age them even more.
During the week, the YW can have a different part of the theme showing for each day simply by turning their shelf sitters.


Hobby Lobby Sample
Fabric Scrap Flip Flops in the Young Women Value Colors
flip flops
bandannas in value colors
Pinking shears
Trim off the hemmed edges of each bandanna.  Cut 1" x "8 pieces from the bandannas.  Use pinking shears to trim around each piece.  Wrap the pieces around the straps of the shoes and tie a knot.  Alternate the colors and push close together to make fuller.  Repeat until both straps are covered.

 Sample Stake Girls Camp Itinerary 
GoogleDocs:
Scribd:


See Also:

Sunday, January 15, 2012

Christmas Coffee Cake (Biscuit Mix)


As shown, I make Christmas Coffee Cake with pecans on one side because my son doesn't like the nuts.  I use my own homemade baking mix (like Bisquick) that has wheat in it to make this beautiful coffee cake.  This way I can rotate my wheat a little faster and the coffee cake tastes sooo much better.  If you make Wheat Quick Mix, you can use regular shortening (that's what the original recipe from Southern Living magazine called for), but I like it even better with butter-flavored Crisco.  Find a scrumpious pancake recipe using Wheat Quick Mix found near the bottom of Some Favorite Campy Things, camping part 2 post.  For delicious homemade 7 Up Biscuits see Homemaker's Journal post Easy, Perfect Biscuits.

Christmas Coffee Cake (Biscuit Mix)
1, 3-ounce package cream cheese
1/4 cup margarine or butter (I prefer butter)
2 cups biscuit mix or Bisquick
1/4 cup milk
1/2 can pie filling of your choice (I like cherry)
1/4 - 1/2 cup chopped pecans (optional)
Cut cream cheese and butter into biscuit mix till crumbly.  Add milk; stir until mixed.  On lightly floured surface, knead dough 10-12 strokes.  On waxed paper, roll or pat dough into a 12 x 8 inch rectangle.


Invert onto greased baking sheet; remove paper.


Spread filling down center of dough.  Make 2-1/2 inches cuts from long sides toward center at 1 inch intervals.


Fold strips over filling and pinch in center.


Bake at 375 degrees for 20 to 25 minutes or until golden.  FREEZE at this point if desired.  When thawed, drizzle with Powdered Sugar Glaze.  Yield:  12 servings.

Powdered Sugar Glaze
In a bowl stir together 1/2 cup sifted powdered sugar, 1/4 teaspoon vanilla and enough milk to make a drizzling consistency (1-2 teaspoons).  If using peach filling, add 1/4 teaspoon almond flavoring to glaze mix and a little less milk.

Thursday, December 29, 2011

Blog Index, page 2

Provident Living
Disaster Preparedness
Alabama's Worst Storm Ever
Real Food Storage Resources (not MREs)

Camping
Girl Scouts
  SWAPS
  Girl Scout Favorite Things
  Camping, part 1 (Camp Songs)
Young Women Camp (i.e. Girls' Camp)
Southern State Parks
  Southern Reflections, Camping part 3
  Monte Sano, Huntsville, AL

Gardening
Freezing Herbs
And the Lord Planted a Garden ... Gen. 2:8
How to Make a Compost Heap
Freezing Blueberries
How to Care for House Plants
Rx for Houseplants
Nesting, It's A Chick Thing Book Review
(especially about taking care of after-gardening hands)

Once-A-Month-Cooking (OAMC)
Freezing a Batch of Soup
Relief Society OAMC Activity
Ham Dinner Slices
Freezer Slice and Bake Cookies
How to Freeze Grated Cheese

Food
Hamburger Gravy Over Rice
Quick Creamed Chicken and Rice
Cooking 101:  Substitutions for Wine and Liquor
No Whine Meal Time
Zesty Tomato Soup
Mellow Meals
Old and New Favorite Recipes
Gobble Good Turkey Casserole!
So Easy Granola
Kid-FRIENDly Meals
The Legacy of Meal Planning, 2
Honey Wheat Muffins
Pearly Shell Chicken Salad
Weight Watchers Four Ingredient 10 Minute Recipes
Three Day Chili
The Best and Prettiest Slaw
Steve's Perfect Sweet Potato Pie
The Best Banana Bread Recipe
Feels Like Christmas Pecan Mocha Fudge
For Seasoned Cooks
Chicken Pillows (aka Chicken Packets)
Poultry Seasoning Mix
Chicken Divine (Broccoli)
Bean Chimichangas (Baked)
Writing My Own Cookbook
Teaching Children to Cook
Christmas Coffee Cake
Peanut Butterscotch Morsels
Yankee Corn Sticks
Creamy Italian Dressing in a Jiffy!
Tater Tot Casserole
Quick and Easy Bierocks
The Lady's Chicken Nuggets
Buttermilk Blueberry Pancakes
Vancouver's Best Salad and Jiffy Pizza Sticks
George Foreman Grill
Foil Packet Dinners
Perfect, Easy Biscuits
Quick Mix Sausage Balls
Pinterest Recipes I've Tried (and my adaptations)
Vintage 1941 Chocolate Chip Cookies
Vintage Desserts: Brownie Pudding
Favorite Store-Bought Baking Mixes
Homemade Chocolate Covered Cherries
Quick and Easy Piping Bag for Gingerbread Cookies (White Frosting)
How to Make Meatballs the Same Size
Quick Starts to Your Family's Day

Dinner

LinkWithin

Related Posts Plugin for WordPress, Blogger...