Thursday, November 7, 2013

Vintage 1941 Chocolate Chip Cookies

My favorite cookbook is Better Homes and Gardens.  I have two copies, both of which are falling completely apart.  One I received as a wedding gift twenty five years ago.  My daughter has a third copy.  I recently found a Better Homes and Gardens chocolate chip cookie recipe that interested me because it used equal parts shortening and butter.  

1941 Better Homes and Gardens Chocolate Chip Cookies
Any time a cookie recipe uses shortening, I know it will turn out beautifully—crisp on the outside, gooey goodness on the inside.  This recipe turned out perfectly the first time, and more importantly, the raw cookie dough was delicious!   

What do you think?  Do you prefer using shortening in your baked goods.  Does it make a difference?


Vintage 1941 Better Homes and Gardens Chocolate Chip Cookies 
Get the recipe HERE.
1⁄2 c. shortening 
1⁄2 c. butter 
1 c. packed brown sugar 
1⁄2 c. granulated sugar 
1⁄2 t. baking soda
2 eggs 
1 t. vanilla 
2-1⁄2 c. all-purpose flour 
1, 12-oz. package (2 c.) semisweet chocolate pieces 
1-1⁄2 c. chopped walnuts, pecans, or hazelnuts (filberts) (optional) 
1. In a large mixing bowl beat the shortening and butter with an electric mixer on medium to high speed for 30 seconds. 2. Add the brown sugar, granulated sugar, and baking soda. 3. Beat mixture until combined, scraping side of bowl occasionally. 4. Beat in the eggs and vanilla until combined. 5. Beat in as much of the flour as you can with the mixer. 6. Stir in remaining flour. 7. Stir in chocolate and, if desired, nuts. 8. Drop dough by rounded teaspoons 2 inches apart on an ungreased cookie sheet. 9. Bake in a 375 degree oven 8 to 10 minutes or until edges are lightly browned. 10. Transfer cookies to a wire rack; cool completely. 11. Makes about 60 cookies. 
Note: To measure shortening with ease, place plastic wrap in the measuring cup and pack cup with shortening using a rubber spatula. Pull plastic wrap out of the cup and drop the shortening into the mixing bowl. Throw plastic wrap away—no mess!

Thursday, October 31, 2013

Decorating with Vintage Linens

The bathroom needed a quick curtain when I finally retired some defective plantation blinds.  I loved the idea of using vintage doilies, cut work, etc. to decorate simple curtains and took a piece out of my stash for this quick fix.  


I really like cafe curtains.  They provide ample privacy, plus they’re easy to open and let in plenty of light and air when desired.  I was inspired from a photo where doilies had been randomly sewn onto similar curtains.  My bathroom also has an open space in the sink cabinet where the laundry basket is kept behind two matching vintage pillowcases.  


The lace at the bottom was handmade.  None of my collected pieces of vintage linens are in perfect condition though I have made an effort to keep them carefully laundered.  I feel that the faint stains, worn areas, and other imperfections give the pieces charm—a story.  It is hard to believe there was a time when women would have the knowledge, time, and inclination to make beautiful, comforting, and useful decorations for their home.  I am glad to find any way I can to incorporate such history into my own home.


I am looking for more ways to use my stash of hand-made finery.  Share your ideas of how to use vintage pieces like the ones I have shown.


Sunday, October 13, 2013

Pinterest Recipes I've Tried (and my adaptations)

For the past couple of weeks, I have been using recipes I found through Pinterest to make meal preparation a little more interesting.  All of these recipes have been quite a success, though I did make a few modifications now and then.  (One time I forgot to turn on the crockpot.  All that was in the pot was potatoes and spices, so I made the meal on the stove instead to make up for lost time.  That was the Slow Low Country Boil).  I did not take pictures of each of these meals because it had not occurred to me to write about this experience.  But I saw that one person had a Pinterest board for pins she had tried.  I want to do that too!  I would like to share my thoughts on the following pins (and to remind myself of any adaptations I would make).  

Here is my Pinterest Board:


Visit Heather's profile on Pinterest.

Skillet Rosemary Chicken 2-24-14
Words cannot describe how delicious and how easy this recipe was!  I used dried rosemary because that is all I had, and I just put all the herbs, spices, olive oil and lemon juice in a blender and pulsed it real good.  I even forgot to place the chicken in the lemon mixture before browning the skin in the skillet, so I basted the chicken really good after I placed it on my mushrooms and potatoes.  I wanted to use up some Idaho potatoes and they worked fine.  I couldn't find anything at Walmart that said cremini mushrooms so I used the cute little white ones.  Those were the best tasting mushrooms I literally have ever had!  And the potatoes turned out very tasty as well.  I only cooked four thighs and all the ingredients fit perfectly in my skillet.  I keep my iron skillet well-seasoned so everything slid out like it was supposed to and I feel the skillet really added to the flavor.  I HIGHLY recommend this recipe.  I can't tell you how good it is to find a thigh or leg recipe that's out of this world like this one.  I collect these recipes because legs and thighs are more economical to buy than white meat.  You can find a great chicken leg recipe I made right HERE.


Freezer Breakfast Burritos

Here is a picture of the Breakfast Burritos.  They were sooooooooooooooooo good!  They were actually better after reheating them in the microwave than they were fresh.  The cheese just got so gooey good.  I can see this being a must have on any kind of trip, especially a camping trip.  If your family likes to eat breakfast, these breakfast burritos are a must-have in the freezer.  I really love collecting and preparing a month-full of dinners at one time and now I plan on doing the same with breakfast foods. 
I did about a half-recipe to try the recipe out for the first time and I recommend doing that because there is a lot going on at one time.  It might be good to have a helper like a child who likes to grate cheese and stir the hash browns or lightly warm the tortillas.  I chickened out at the last minute and did not put the spinach in with the eggs—but I will try it next time because I really love spinach. 


Taco Pizza

The Taco Pizza was amazing!  It turned out just like the picture (so I did not need to take a picture anyways).  The only thing I would do different is to remember to kind of toss the chopped tomatoes on a paper towel because it made the pizza a little wet in some places.  We did not have leftovers, but if you did, you would not want any sogginess on the pizza.


Outback Green Beans

I made the Outback Green Beans and they were very good.  This is a great recipe if you can get garden fresh green beans because store bought is just not the same.  I steamed my green beans and they would have been perfect if I had remembered to stir them in the steamer so they get the same amount of doneness all over.  Also, I would only make a half recipe of the sauce.  However, I imagine using the extra sauce on chicken for another meal would be delicious.


Forgotten Chicken

The Forgotten Chicken was very interesting.  The rice turned out beautifully.  However, I do not happen to like using Lipton Onion Soup Mix as a seasoning on top of the chicken as the recipe instructs.  It was too overpowering for me and I only used half a packet.  I believe using my own special seasoning blend would be even better because my blend brings out the best flavors in chicken and the two condensed cream soups have plenty of flavoring as well.  My own seasoning blend recipe can be found HERE but basically consists of salt, course pepper, celery salt, onion powder, and garlic powder.  I use it so much that it is kept combined in a shaker to use whenever I need.  This recipe will definitely be tried again with the minor change.  What a great way to use Minute Rice brown rice which is supposed to be healthier.  I also recommend this recipe as a comfort meal to take to someone.

 Skinny Slow Cooker Chicken

Skinny Slow Cooker, Chicken and Mushroom Gravy

The changes I made to Skinny Slow Cooker, Chicken and Mushroom Gravy was to use boneless thighs instead of skinless chicken breast filets.  I believe this change made the recipe even better than it already was, plus it was cheaper.  You could combine thighs and legs if you wanted to.  The herbs and spices with the oil (I used light virgin olive oil instead of canola) made the chicken so delicious.  When I make this again, I am not going to bother with the gravy.  The chicken makes its own wonderful broth and I felt adding canned broth and making a gravy was unnecessary.  I put the chicken and mushrooms on top of Minute Rice brown rice and the family gobbled it right down.


Slow Low Country Boil

The Slow Low Country Boil, (the one I forgot to turn the crockpot on for), was truly restaurant quality.  The cost was moderate and the meal was even better than a comparable one we had at Red Lobster a few weeks before!  I even found Red Lobster biscuit mix at Walmart and had my husband whip them up to go with the meal.  He never cooks and they turned out beautifully.  This is a fabulous meal.  We made it with frozen corn on the cob halves and just left them as halves, although they would have been prettier if I could have followed the recipe with shucked corn cut into four pieces.  Ya’ll definitely try this one because it would really impress guests!


Cheese Steak Sandwiches

One of my fav’s was the Cheese Steak Sandwiches.  Fall is a great time of year to figure this one out.  I am going to give a few more details because the pin does not have much.  I had never made cheese steaks before and was a little nervous.  The recipe calls for cheap steak and that is what I got!  Look at the pictures on the pin to get an idea what the steak should look like at the store.  Then slice it pretty thin, discarding the fat. 
I cooked it in its own juices with the onion and salt and pepper on medium heat until its own juices were almost gone and then I put the French onion soup in there and brought it to a boil, lowered the heat to medium-low, and put the lid on the pan.  Being Southern, I wanted to slow-cook the steak in the soup until the meat was very tender. 
I used two pieces of American cheese for each hoagie sandwich, doubling the cheese, and tearing in half so every part of the sandwich had cheese.  These sandwiches were going to be cheesy!  They were so good, I felt like such a glutton! 
My family said they were better than any restaurant sandwich they had ever had, and my daughter has actually been to Philly and had an authentic Philly Cheese Steak.  This is definitely a great meal for football fans.


Crock Pot Chicken Fajitas

Okay now for Crock Pot Chicken Fajitas.  I loved this recipe because it said you could use thighs.  I was skeptical and up to the challenge of trying fajitas made with thighs.  This recipe was out-of-this-world!  It made a lot and there was NOTHING left folks!  This is definitely the one to do for teenagers and guys—a really easy recipe for after church or Saturday college football in front of the tube.  

How have the recipes on Pinterest been working out for you?  I find most of them fairly reliable but I have also had my share of disappointments.  Let me know!


Saturday, August 31, 2013

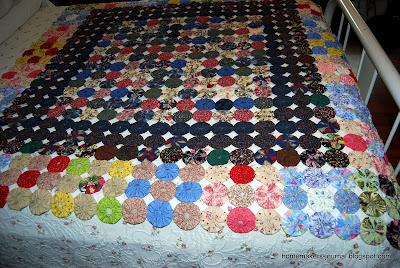
Retro Yo-Yo Quilts

Here's what you can do with all those little bitty pieces of fabric you have left over from sewing projects.  It's a yo-yo quilt!  Yo-yo quilts became popular during the Great Depression, and I fell in love with them from the first time I saw a yo-yo quilt.  Making yo-yos are great because you can take the materials in a little baggy in your purse and sew no matter where you are--even in church (yes, it's true)!  You can make pillow covers, table runners, coasters, decoration for a guest towel...the possibilities are endless!


Quilts Can Represent a Lifetime

My throw may not look like much but it means a lot to me because each yo-yo represents an outfit or project I sewed for my family over the last twenty-five years.  My original inspiration came from a photo in Better Homes and Gardens (I think?).  This clipping is beat up cause it was kept in my idea notebook and referred to often.

Probably published in Better Homes and Gardens many moons ago.

Yo-yos Are Easy to Make

I just kept the quilt in a storage box and added onto it as I had more yo-yos and yo-yo squares completed.  I found the instructions for yo-yo quilting in an old craft book from the library, and I'm sorry to say I didn't keep the source info. on the book :(  I just made myself plenty of circle patterns out of old manila folders I planned on throwing out.  Then I would pin my pattern to leftover scraps of fabric and cut the material out.  This can be done assembly style (all the pinning and cutting done at once) so that the yo-yos are ready to be sewn.  Make them whatever size you want.  Put two yo-yos right sides together and sew a few stitches (whip stitch is fine) to attach them.  Use a thread that will not be too obvious.  I prefer quilting thread for this project because it is a lot stronger than regular thread.

source unknown

Resurgence in Yo-yo Crafts

Yo-yo quilting has become popular again and Hobby Lobby keeps instructions and durable circle patterns in the hand-sewing isle.  Instructions and ideas can be downloaded from their website as well.  This is a great beginning sewing activity for youngsters and my children have really enjoyed having something useful to do while watching television or waiting in the doctor's office.  

I hope you will try yo-yo quilting too.  I invite you to share ways you have used yo-yos in your crafting :)

Monday, July 15, 2013

Quick Mix Sausage Balls

These sausage balls are so easy to make and because you can freeze them, you always have something delicious for last-minute company to chow down on or to take to any gathering.  The sausage balls shown is a before-shot.  

I like to use parchment which I use several times before throwing away (this recipe makes a lot).  I actually find that these sausage balls bake up even better after they have been frozen, if that makes any sense.  I do not know if it is because the mixture and flavors have had time to meld.  I now prefer to have sausage balls with any type of breakfast menu rather than sausage by itself.  It really makes the sausage go a long way.  I promise to remember to eventually have an after photo (I keep forgetting)!


My sausage balls are made with a homemade baking mix I like to call Quick Mix.  My Quick Mix recipe uses wheat flour so it is a little bit healthier! (Find homemade Quick Mix and other recipes found on My Quick Mix post).

Quick Mix Sausage Balls
3 cups baking mix
1 lb. hot ground pork sausage
10-oz. pkg. sharp cheddar cheese, shredded

Combine mix, sausage and shredded cheddar in a large bowl, pressing mixture together with hands.  Shape into 3/4 inch balls and place on lightly greased baking sheets (or use parchment).  Bake at 400 degrees F. for 15 to 18 minutes or until lightly browned.  Yield: about 8 dozen.  Sausage balls may be frozen uncooked.  Bake frozen balls at 400 degrees F. for 18 to 20 minutes or until lightly browned.

I collect "Quick Mix" recipes, or it's sometimes just called baking mix.  I have even heard it called Missouri Mix--it has many different names.  My original recipe comes from an old Southern Living Magazine.  But it is my goal to find as many different, useful, and delicious recipes to use with my Quick Mix as possible and would love to hear of any others out there, so please let me know!


Friday, June 14, 2013

Perfect, Easy Biscuits

There are a few things that I think every homemaker should be able to do well, and one of those is make perfect biscuits.  I found a fabulous recipe for 7up Biscuits using Bisquick from www.plainchicken.com.  I was so excited to find this different and easy recipe using Bisquick since I make my own homemade version of a quick mix which uses wheat.


The recipe can be found and printed out at www.plainchicken.com.  I will describe the process adding some helpful hints for those who may be biscuit-making novices.

Step-by-Step Procedure

Heat the oven to 450 degrees F.

I go ahead and melt one-fourth cup of butter in my 9 x 9 inch pan in the oven.  Be sure to take the pan out when butter has melted so it won't brown.

Place two cups of Bisquick, or your own quick mix, into a large mixing bowl.  You can make a well in the center if you like and place a half-cup of sour cream (I like Daisy).

I actually work the sour cream gently into the Bisquick with my fingers until the sour cream has wetted most of the flour mixture thoroughly.

Then I pour 7 Up into a half measuring cup but more-than-likely, I will not use the entire half-cup.

Just sprinkle the 7 Up by Tablespoon over the top of the sour cream and Bisquick mixture.  Use a fork to fluff the 7 Up throughout the mix.

When most of the Bisquick has formed a ball in the center with just a little bit still hanging to the sides of the bowl, the dough is probably ready to gently knead together on a lightly floured counter.  The key is to use as little flour when kneading and only knead enough to be able to pat dough into a square.

Since I don't want to overwork my dough, I don't bother with the biscuit cutter.  I just pat the dough into a square slightly smaller than the measurements of my 9 x 9 inch pan (or 8 x 8), rather than use a rolling pin.

Use a sharp knife to cut into squares.  Then I place each square right onto the butter in the pan basically in the same exact way that I patted and cut it out on the counter.

Bake for 12-15 minutes, or until golden on top.  Cool in pan on a cooling rack (if they last that long!)  They are best served hot from the oven.

Baking Mix Recipes to Try

I like having the biscuits slightly connected so they are flaky and  moist.  This recipe is so good, the texture is almost like making yeast rolls.  This would be a great recipe for camp and cooked in a box oven!  My box oven instructions can be found at Homemaker's Journal, Easy Outdoor Cooking Recipes post.

For more delicious Quick Mix recipes see Homemaker's Journals beautiful and delicious Christmas Coffee Cake post and scrumptious Quick Mix Pancakes found at Some Favorite Campy Things, part 2.

I hope you enjoy this recipe as much as our family has.  I like to experiment with recipes using soda pop as an ingredient.  How do you use soda in your favorite recipes?

Monday, May 20, 2013

Nesting... Book Review: Wabi Sabi Style

Book Review, part 2:  Nesting, It’s A Chick Thing, by Ame Mahler Beanland and Emily Miles Terry.

“It’s All Good” describes the wabi sabi style in a nut shell.  Wabi Sabi, is kind of like Feng Shui, only different.  It is an Eastern design principle developed by Zen monks and is centuries old.  It is based on a tea practice and embraces the beauty of imperfection and irregularity.  

I bought this book!
If you love and value old things that have stood the test of time and like to use these in decorating the home, your style could be wabi sabi.  “The real power of wabi sabi is tapped when you extend its forgiving concepts to your life, your relationships and your self,” (Feathering Your Nest pp. 60-61). 

Wabi Sabi reminds me of shabby chic because it is important to avoid clutter and to take care of imperfect things, such as cleaning and oiling old wood floors rather than refinishing them to perfection.  There is nothing more beautiful than preserving the patina of aged wood.  Nesting... suggests decorating with multifunctional and/or meaningful, attractive items.  They can be interesting artistically, like unusual lamps or frames.  Collections of family photos and heirlooms can lend a spiritual feel to a room.  And of course with all Eastern principles, bringing nature inside is characteristic of wabi sabi.  Nesting... provides other sources about wabi sabi design.  If you are like me, the simple aspects of this style of decorating are very attractive and it is nice to know that for once I am fashionable!

What do you think?  Is Wabi Sabi style the new Feng Shui?  Let me know!

Wednesday, May 1, 2013

Nesting, It's A Chick Thing Book Review

Book Review, part 1:  Nesting, It’s A Chick Thing, by Ame Mahler Beanland and Emily Miles Terry.


Make it Your Beside Table Book

This book was a lot of fun to read.  I could see it being a great nightstand book in a guest room or displayed on the coffee table because you can pick it up any time and begin reading anywhere in the book.  It is kind of like a printed blog of posts, many of which are written by famous guest writers.  The book includes great quotes and recipes, interesting facts and background information, and whimsical vintage photos—all having to do with us “chicks.” 

Primping--it's A Girl Thing!

I plan on making time to try all the fun ideas on p. 223 “Preparty Primping.”  One idea was to try out several hand preparations, ending with 2 base coats on the nails, a pretty pink coat of nail polish, then use a toothpick and yellow and white nail polish to create daisies.  End with a top coat to protect the masterpiece!  Nails any garden aficionado would be proud of!

Gardening

Speaking of gardeners, a good handsoak after working in the garden consists of adding two drops of each to warm water:  chamomile, lavender and geranium essential oils.  After soaking your hands for 10 minutes, use a nail brush to remove any dirt that’s left under the nails.  Rinse thoroughly and pat dry with a soft, fluffy towel to seal in moisture.

The book recommends making a hand scrub to keep in a jar by the kitchen sink.  The scrub can be used to slough off the rough skin and stains from working in the garden.  As before, rinse with warm water and pat dry.  Combine 1 c. coarse salt, 2 drops peppermint essential oil, 3 drops lavender essential oil, ½ ounce sweet almond oil.

Soft-as-Daisy Hands

For soft-as-a-daisy hands, combine one tablespoon sweet almond oil and one-half teaspoon castor oil and add 2 drops of geranium and rosemary essential oils as well as 4 drops clary sage and lavender essential oils .  Massage hands with the oil using a soft towel to push back the cuticles carefully.  They recommend using cotton gloves (or white cotton tube socks), to keep hands covered overnight.  Be sure to rinse thoroughly with warm water—taking care to scrub the nails gently with soap to remove the oil—and pat dry.  

All of these ideas are a great way to have hands manicure-ready after a hard week of gardening!  However, the book was about a lot more than manicures.  This was what I was most interested in.  My next post is about Nesting, It's a Chick Thing, only I focus on a decorating trend I am really interested in.

I like the idea of leaving something fun to read for a guest in my home.  How do you fix up the guest room when you have a visitor?

Monday, April 15, 2013

Small Home Decorating Tips

Here are a few tips I have gleaned while trying to scale down to a small home (1400 sq. ft.).

Furniture

The more floor seen—the larger the room will feel—so have furniture that shows the floor.  Incorporate narrower furniture.  It can be a long couch (10 feet!), but if it’s narrow, it will take less space.  Flat screen TV’s have made all the difference in our home!  It’s the same principle.  Choose less bulky furnitshings.


Clean and Uncluttered

Show as much window as possible and clean them regularly.  Hang drapes higher and the room will seem taller.  Every time you bring new stuff home whether it’s books, collectibles or any kind of decorations—take something out of the home.  Cluttering the house, coffee table and shelves with stuff can make a home feel smaller. 

Style

I lean towards vintage furniture especially from the forties and fifties that was designed for smaller homes.  When refurbishing, I prefer slipcovers or reupholstering that will show the legs which are often interesting anyways (and shows more of the floor). 


Purge


Finally, don't be afraid to consign or donate extra stuff that just doesn't fit.  After going through this a few times, I'm less likely to make purchases without fully considering their impact on my space.

Do you think more people are scaling down to smaller spaces to live in lately?  This seems to be a new trend these days.  What do you think?

Monday, April 1, 2013

Laundry Rules!

I have a family of five:  a husband, a junior boy in high school, a sophomore girl in college, and a senior girl in college.  The two college students have had to come home and finish up at local colleges because our family’s single income has continuously gone down since Obama was elected (both times).  I’m back in school recertifying to hopefully attain that non-existent teaching position.  Therefore, it has been my mission to not waste a dime if I can help it. 

Photo from Homemaking for Teen-agers, Book 2, McDermott and Nicholas, 1958, p. 190


Where is Income Being Wasted?

Some major household expenses are utilities, food, and clothing.  These are things everyone basically wastes money on even though we generally have nothing to show for it when all is said and done.  Once we eat food, it’s gone (only the memory of a tasty meal and maybe an extra pound or two remain).  And when we take that extra-long shower (more than 10 minutes), or leave all the lights on and run the TV no one is watching, etc. nothing remains of this expense as well.  Some of us are very good at purchasing and caring for “classic” pieces and shoes that are well worth the initial expense.  However, more than likely, we buy clothes that will be outdated and worn out from misuse well before the expense has been worth it. 

Another Dave Ramsey Reference

I recently heard Dave Ramsey tell a man with a single income of $140,000 (I wish) that if his wife would invest $600 a month on a mutual fund for the next thirty years (she was forty), by the time she was seventy the mutual fund would be worth OVER TWO MILLION dollars!  Her issue was having the latest fancy car, but how much do we spend on clothes each month?  How much does that accumulate each year?  How much would we have if we were more careful with our expenditures and invested the money saved on electricity, food and clothes into a kick-!#* mutual fund.  I would like to be a millionaire if I’m lucky enough to reach seventy!  (P.S.—Dave didn’t mind if she had a fancy new car—just pay cash for it!  And with their income, and only buying a new car every three or four years, why would you not be able to do that?)

Take Care of Investments

Any-hoo, the point of this post is that I find myself at this late date, having to teach The Fam how to wash clothes so they don’t ruin my irreplaceable Whirpool Duet washer and dryer purchased in much happier financial times.  Since I hope to find regular work soon and cannot be on top of the clothes-washing situation, I have to protect our investments of appliances, clothing and utilities.  Plus, it would be nice if everyone knew how to wash clothes properly.  Hence—The Rules. 


The Rules

Believe me, there’s a story behind each rule.  Hopefully these rules posted above the washer and dryer will promote appreciation for how much things cost because “the buck stops here.”  No more Mom buying fancy detergents, clothing for school or gifts, or water and electricity to re-wash forgotten clothes that have mildewed in the washer overnight.  I encourage folks to start their own rules earlier than I did—kids (and husbands) can learn to wash clothes as soon as they have enough to make three loads of just their clothes!  Does this mean they will do it right when they leave home?  Apparently not.  But it won’t be because we didn’t try!  These are the rules for our home:

If you have a problem with these rules, the machine owner (Mom) will be glad for you to take your laundry elsewhere:

1.   Do not start laundry after 9pmFold and put away each load immediately!!!
2.   Never use the Heavy Duty or Whites Cycle without the owner’s permission.  If the clothes are extra dirty or the load a little larger, press the button for more or less soil.  There is even a soak function if the clothes need to soak a while.  Whites and Heavy Duty take much more electricity and most of the time the normal cycle will suffice.
3.   ________ can wash her clothes with Mom’s since she has "so few clothes" because you can never wash all your clothes in one load—that will cost money in the long run due to clothes deteriorating quickly with such abuse.
4.   Everyone has a clothes basket assigned to them.  Only two people—________ and ________—may keep their clothes baskets in the hall bathroom.  DO NOT put your clothes in those baskets unless they are yours!!!!
5.   Everyone should do at least 3 loads of clothes each time they do their wash—DARKS, WHITES, and COLORS.  You can put it on a smaller cycle or get with someone else to make a larger load.
6.   Only ________ washes his clothes with the hypoallergenic detergent.  ________ has bought Gain, and Mom buys Wisk or New Era (red bottles) and Cling Free softeners.  There will always be a $1 detergent and softener available to those too cheap to buy their own.  Most of the time you fill the dispenser only 1/2-full of detergent.
7.   Only wash clothes if you will be available to take them out immediately and start the next load immediately.  With everyone doing their own wash, it will take forever if some refuse to stay on top of their laundry cycles.

Laundry Rules! Printable

In this economy, Dave Ramsey is a hot commodity.  Do you agree that you should "live like no one else so that someday you can live like no one else?"

Monday, March 18, 2013

Curing Scalp Acne

This might be kinda weird to write about, but maybe some people can relate.  It’s those itchy pimples on your scalp that ooze an oily substance when they pop.  Yeah gross!  Having them once-in-a-while is not really a problem.  It’s common around a menstrual cycle.  But some have a much bigger all-the-time problem, (and if you are unlucky to share a brush with them on a regular basis, you might get the problem too)!  

Circa 1970's The Last Time I Had Perfectly Healthy Hair!
I researched scalp acne and was able to eliminate it completely!  I’m not kidding.  I’m not really prone to this but as I said, sharing a brush or using the wrong shampoo or too many products on your hair could cause a horrible, itchy breakout!  If you have processed hair, or my suggestions aren’t working, consult a professional hair care consultant or even your doctor.

Some Possible Causes

Using too much of an oil-based shampoo or other hair-care products can also contribute to acne breakouts on the scalp.  I was using products to help with frizzy hair and I had to get rid of them.  I learned to read labels and avoid products such as shampoo, conditioner or gel that contain irritating substances like propylene glycol, sodium lauryl sulphate, parabens, alcohol, lanolin or mineral oil.  After spending a really long time in the pharmacy hair care isle, I was amazed how many brands have these ingredients—even the ones that are supposed to help with scalp problems.

Take Preventive Measures

To prevent scalp acne maintain good scalp hygiene.  Keep the scalp and hair free from dirt and grease by washing the scalp regularly with a mild shampoo and luke-warm water.  Keep anything like a hat or whatever you put on your head clean.  Clean hair brushes and combs and don’t share these with anyone.  Change pillowcases often.

Try This Cure

To cure scalp acne, I washed my hair with Johnson and Johnson Baby Shampoo.  Then I put a cup of vinegar in a condiment bottle (Walmart sells them in the plastics isle—it’s what you can put ketchup and mustard in).  I rinsed my hair with vinegar by squeezing the condiment bottle along my scalp until I felt every bit of scalp had been hit with the vinegar.  Then I rinsed very well with luke-warm water.  The colder the water, the better hair care products will rinse out.  That’s really important for eliminating scalp acne.  I recommend doing this cleansing process every so often to strip the build up in the hair.  I also avoided scratching my scalp and if I accidentally did, I would clean the pimple with hydrogen peroxide on a Q-tip.  

I also bought a brand new hair brush that prevents static cling (which was one reason I used products on my long hair).  And I hide this hairbrush and don’t let anyone else use it.  I keep other hair brushes around as decoys ;o)

Remember when the isle with shampoo contained a lot of other things besides just shampoo?  Have you checked out the local Walmart shampoo isle?  It is shelves and shelves on both sides of the isle, from top to bottom, filled with hair-care products.  Do you think hair-care products are being over-used?  Could this actually be harming our scalp and hair?  What do you say?

Monday, March 4, 2013

How to Teach Children Responsible Behavior

I have been really surprised by how irresponsible our society has become—especially in the highschool and college venue.  Twenty-five years ago, my professors didn’t take excuses, you just got a zero.  Now high schoolers and college students can talk their way into extensions and prompting the answer to test questions from the instructor and other forms of CHEATING.  From what I hear, cheating is a real problem in high schools and colleges everywhere.  Apparently it’s a problem in the work force as well.  I think cheating is a form of being irresponsible.


Responsibility and other character issues will be taught by me to my own children now, and the children in my care when I am a teacher.  In the 1990’s, Character Education became important to many Americans.  There was even a movement—I remember getting these great little books and tapes on different character traits every time we went to Chick-Fil-A for kid’s meals.  (I believe there was an immoral president in office at the time?) 

Responsibility is a character trait that I feel needs more emphasis in schools since fewer children attend church regularly and have a very good chance of not being taught responsibility at home.  In a recent education class to recertify, I learned something new about teaching children responsible behavior. 

It was so exciting I immediately made a chart to use in my future class.  Hellison (2011) is cited in the textbook, Dynamic Physical Education for Elementary School Children (Robert P. Pangrazi and Aaron Beighle 2013).  On pages 108-110, the text gives a very good breakdown of his hierarchy of responsible behavior we can teach children.  I found this very enlightening for myself even! 

I’m sharing the chart I created with my D.J. Inker’s Dazzle Daze (2000) graphics I bought (I love her artwork!)  I had a little Family Home Evening lesson with the family and gave each of them a handout with the hierarchy of responsible behavior.  Then I also permanently displayed the chart on the front door.  We discussed what each level beginning with 0 would look like in real life and gave real examples.  Then we judged where we might be on this scale.  It’s a very real possibility that in different aspects of our lives we could be in more than one place.  The goal is to accomplish all levels leading up to the highest as the most desirable responsibility traits to attain.  Of course there might be setbacks to overcome.  I tried to put the chart in terms that even First Graders could relate to and understand.

Hierarchy of Responsible Behavior Printable

How do you help your children learn responsibility and do you think people are becoming less responsible in today's world than they were even a decade or two ago?

Monday, February 18, 2013

Foil Packet Dinners

Served with just regular old Wonder Bread or buttery Texas toast, this is my go-to meal.  My 17-year-old son LOVES this rendition of barbecued chicken and so does my pocket book!  I like to collect foil packet dinners for camping, but I end up making this meal all the time ‘cause it’s so easy and inexpensive.  Instead of individual packets, I throw the whole thing in a large pan and wrap tightly with foil.  You can increase or decrease the portions as you like or use chicken thighs as well as legs.  Heck, throw in a few wings. 


My favorite inexpensive sauce is Kraft’s Spicy Honey BBQ Sauce.  I also like to cook the meal a full hour ‘cause a lot of us Southerners believe in slow-cooking our barbecue.  (You can turn the oven down a little if you like).  Try this hearty, finger-lickin’ meal and see if you don’t join our fan club!  P.S.  I never defrost the corn on the cob and it turns out great every time!

Are you a fan of foil packets too?  What are your favorite ways of using aluminum foil when cooking?

Barbecued Chicken in Foil printable
8 chicken legs                                                    2 T. butter, melted
4 small ears frozen corn, thawed                      ½ c. barbecue sauce
1 t. salt                                                               1 (15-oz.) can pinto beans, rinsed and drained
½ t. pepper                                                     
Toppings: barbecue sauce, shredded Cheddar cheese, chopped green onions
This recipe can be done as follows (which is great for campouts!) or when I do this at home, I put everything in my largest pan and wrap the top tightly with foil.  This recipe also doubles very well!
Tear off 4 (18 x 12 inch) sheets of heavy duty aluminum foil; lightly grease 1 side of each.  Place 2 chicken legs and 1 ear of corn in center on lightly greased side of each foil sheet.  Sprinkle evenly with salt and pepper; drizzle corn evenly with butter.  Spoon barbecue sauce evenly over chicken; top evenly with beans.  Bring together 2 sides of each foil sheet over ingredients, and double fold with about 1-inch-wide folds.  Double fold each end to form a packet, leaving room for heat circulation inside packet.  Place packets on a baking sheet.  Bake at 450 degrees for 40 minutes.  Carefully open packets to prevent burns from hot steam.  Serve with desired toppings.

Monday, January 21, 2013

Love Affair with Pantries


I've had a love affair with pantries since I was a little girl. My next door neighbor had this whole closet right off the kitchen where she kept all her food.  This looks very much like the pantry she had in her early 1950's home. It's the type I want the most if I had a choice.  How convenient to just enter a room and be able to see everything you have at a glance!  I think all kitchens should have this included in the house plans.

My Grandma's kitchen had several mysterious rooms.  There was a mud room with a deep sink and updated with a washer and dryer. A screened-in porch where I'm sure many a pea was shelled and maybe used as a sleeping porch (the room was later closed in as an extra guest room).  Grandma had a lovely butler's pantry that she kept a giant, ancient freezer chest.  The room had windows in the alcove area and a built-in china cabinet.  But the most mysterious and unusual room was a long narrow closet that was her pantry.  From top to bottom the closet was lined with sturdy shelves.  It reminded me of the one the chauffer took a can of salmon out of in "Driving Miss Daisy." 

In The First Four Years, by Laura Ingall Wilder, Almonzo built the most amazing pantry in their new home.  The description includes flour bins!  I love to study the illustration shown in the book. 

Before Pinterest, I kept magazine clippings such as these, organized in a notebook, as inspiration for my ultimate pantry (I apologize for the picture's graininess.)  I've seen the first couple of pictures pinned on Pinterest that I clipped from a Martha Stewart Magazine years ago. 

From Martha Stewart Magazine
This is a great organizational idea for keeping up with and rotating food storage and supplies.  Another great idea comes from Ensign magazine for using an easy pocket chart system where even children (and husbands) can help.
From Martha Stewart Magazine
This is a great idea for those of us who must keep our storage in the garage or basement.


Here is an excellent way to use space inside the walls.  I love it cause you can see what you have, and yet it's still kinda hidden and there's the old-fashioned feel of a screen door.  Of course I don't find screen doors like this practical anymore on my front and back doors and opt for more energy-efficient storm doors, so getting to use a screen door somewhere in the house is nostalgic and you can often find them discarded and needing just a little TLC.


This pantry is what most new homes provide and is the simplest and least expensive for those of us who have an extra traditional closet to use.  I've seen a lot of good ideas on Pinterest for organizing pantry items using this storage system.

from Southern Living Magazine
I include this picture just because it is so inspiring.  Maybe one day I'll get my act together and have such an array of home-canned items.  Right now I'm lucky if I get jam or jelly done each year.

Monday, January 7, 2013

How to Freeze Grated Cheese


Lately, I've been trying really hard to stick to a strict grocery budget--after all, when you purchase and eat food, what do you have to show for it?  I'd rather not waste money on food that might get thrown out.

However, it can be tough to purchase items for a two-week period and realize someone just made a snack with the cheese you needed for Thursday night's dinner, (especially when they could have eaten what you prepared for snacks!)  So I try to pre-prepare for my family's meals as much as possible.  

I have started using a permanent marker to label everything that goes into the pantry and fridge for a specific purpose.  That doesn't mean everything is labeled--just what absolutely cannot be used up before I need it.

I remembered that I can go ahead and shred my cheese and spread it out on plastic wrap on a cookie sheet and place in the freezer.  It only takes a few minutes to harden enough to place in a freezer bag and store in the freezer.  Shredding is a good job for one of the kids to do, but you might want to freeze it yourself to ensure it gets properly stored.


Zesty Tomato Soup is a fabulous last minute meal.  Just keep some frozen Monterrey Jack Cheese on hand and cans of tomato soup and some oyster crackers in the pantry.  It's seasoned with chili powder.  It really takes tomato soup up a notch!  I would serve this to last minute company or when having the girls over for lunch. 

LinkWithin

Related Posts Plugin for WordPress, Blogger...